


Who This Is For
- Plant and line managers who want fewer surprises during changeovers.
- Process engineers who own the first-article OK and need a simple path to get there fast.
- Maintenance and mold technicians who carry the molds and make the magic happen.
This playbook works on common EBM (mono/coex) and SBM (reheat stretch blow) machines used for food, beverage, and household chemicals.
Need specs or options while you read?
Safety & Prerequisites
I never start a mold change without these. They are non-negotiable.
LOTO (Lockout/Tagout)
- Isolate electrical, compressed air, hydraulics, y heat.
- Bleed residual pressure. Confirm zero energy at the point of work.
- Two people verify. One calls, one points. Clear call-outs.

EPI
- Cut-resistant gloves, heat gloves, eye protection, safety shoes.
- For hot molds, sleeves help more than you think.
Heat & Pressure
Assume everything is hot and under pressure. Treat hot hoses and manifolds like live snakes.
Two-Person Rule
Any lift or suspended load gets a spotter.
Prerequisites
- Replacement molds staged on a cart; water/air ports capped.
- Quick-connects labeled and tested.
- Torque wrench with a calibrated chart ready.
- Cooling water quality checked (scale ruins even the best molds).
- First-article inspection forms printed.
- For food contact, sanitation plan signed off.
Skill & Time
With a trained 2–3 person team: a single-cavity EBM change can take 45–90 minutes; a 4–8 cavity SBM insert swap 60–120 minutes, depending on access and alignment. Your numbers will vary. The goal is stability first, speed second.
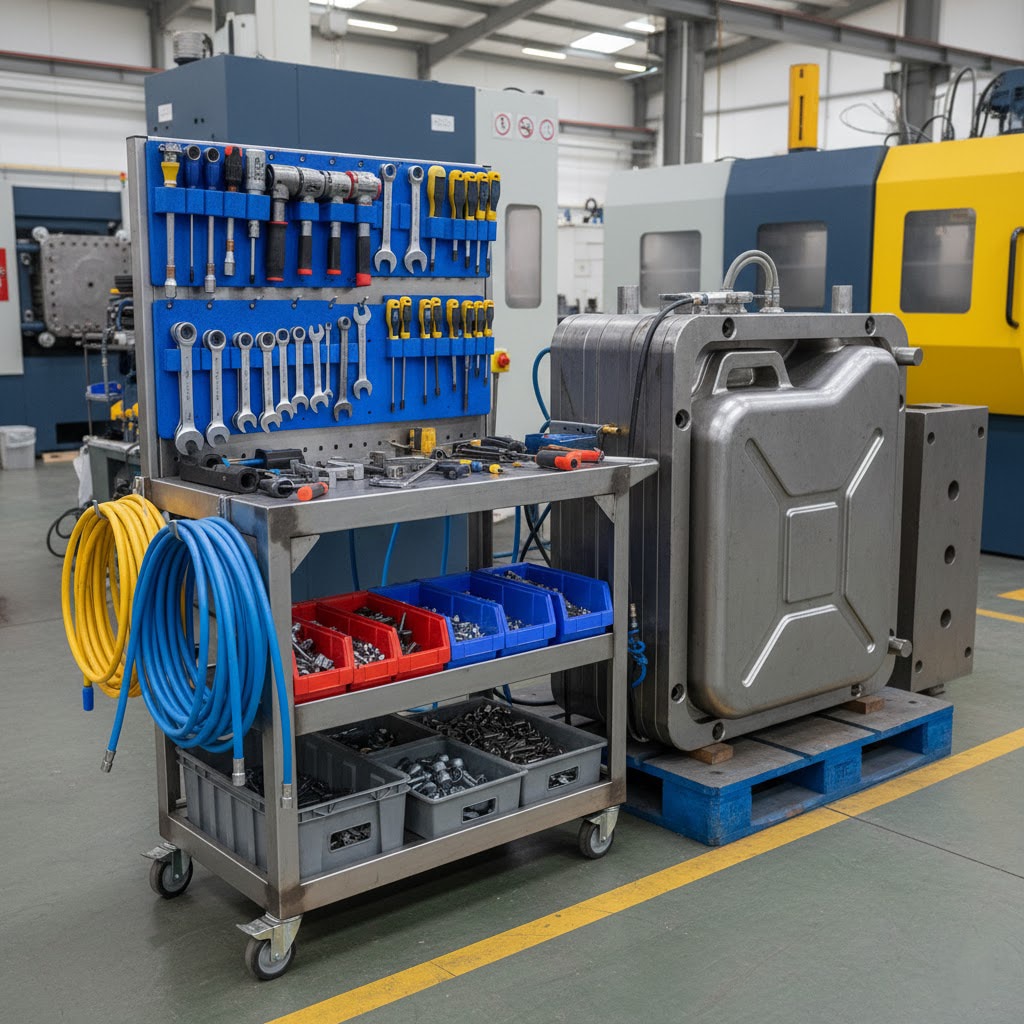
Tools, Spares & Setup
I group prep into six buckets so nothing gets missed.
- Lifting & positioning: mold cart, hoist, rated slings, lifting eyes, centering pins.
- Fastening: torque wrench, sockets, Allen keys, anti-seize, threadlocker where specified.
- Servicios: quick-connects for water/air/vacuum, spare O-rings, PTFE tape, blanking plugs.
- Measurement: feeler gauges, straight edge, dial indicator, IR thermometer, calipers.
- Cleaning & protection: lint-free wipes, alcohol cleaner, plastic-safe degreaser, rust inhibitor.
- Documentación: torque chart, mold card, alignment sheet, leak test sheet, first-article checklist.
I tag supply como return lines with color. Blue in. Red out. Simple color helps under pressure.
Step 1 — Plan the Mold Changeover (SMED Mindset)
I plan like a pit crew. Anything that can be done while the machine runs is external work. Anything that must wait for stop is internal work. I move as much as I can to external.
- Pre-heat or pre-cool the incoming mold to within ±10 °C of target.
- Pre-stage hoses with caps on both ends.
- Load the recipe (setpoints, timings, pressures) under a new version tag.
- Walk the cart path and clear clutter.
- Hold a one-minute huddle: who calls, who lifts, who connects, who documents.
Define “good.” We write down one sentence: “Leak-free, target weight ±2%, neck fit OK, wall map in spec, visual clean.” That single line drives choices later.
Step 2 — Stop & Stabilize the Blow Molding Machine
- Drain material. EBM: run parison thin to purge, stop screw, pull back head pressure. SBM: finish preforms in the oven or divert to cooling.
- Controlled cool-down. Reduce heater zones in steps. On SBM ovens, keep a low base to avoid a full cold-start.
- Home the axes. Carriage, clamp, head/needle to safe positions.
- Release residual energy. Bleed air, relieve hydraulic accumulators, open water header bleeds. Then apply LOTO and say it out loud: “Lockout applied. Zero verified.”
【配图建议:停机与降温步骤顺序图】
Step 3 — Disconnect Utilities (Water/Air/Electric)
I disconnect in a clean order and keep fluids off the floor.
- Close supply valves. Open drains into a catch bin.
- Cap both ends immediately. Label anything ambiguous.
- Unplug sensors/thermocouples by the connector body, not the wire.
- Wipe manifolds. Snap a quick photo for reassembly and training.
I keep a small “leak kit” on the cart—O-rings, clamps, PTFE tape, spare quick-connects.
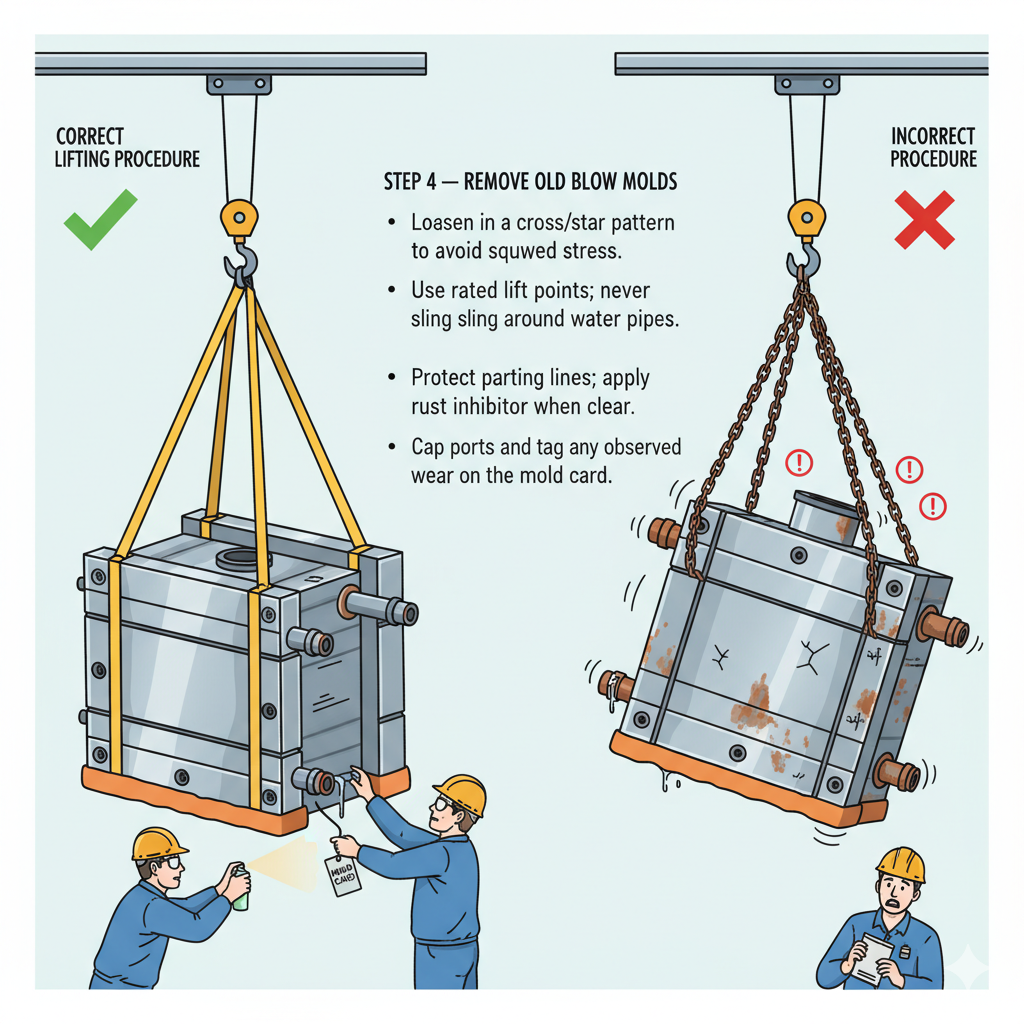
Step 4 — Remove the Old Blow Molds
- Loosen bolts in a star pattern to avoid skewed stress.
- Use the right lift points; never sling around pipes. Prefer dedicated eye bolts.
- As the mold clears, wipe a light rust inhibitor on cavity and parting faces.
- Return the mold to the cart. Cap ports. Tag any damage or wear.
- Document wear: leader pins, bushings, vent grooves, pinch-off land (EBM), neck ring faces (SBM).
Step 5 — Clean & Prepare the Machine
Clean interfaces are everything.
- Wipe platens, rails, locating pads.
- Check ejector/blow pin alignment and travel limits.
- Inspect interlock switches and safety gates.
- Apply a thin coat of high-temp lubricant to guides (never the cavity).
- Confirm centering pins and stops are correct for this mold family.
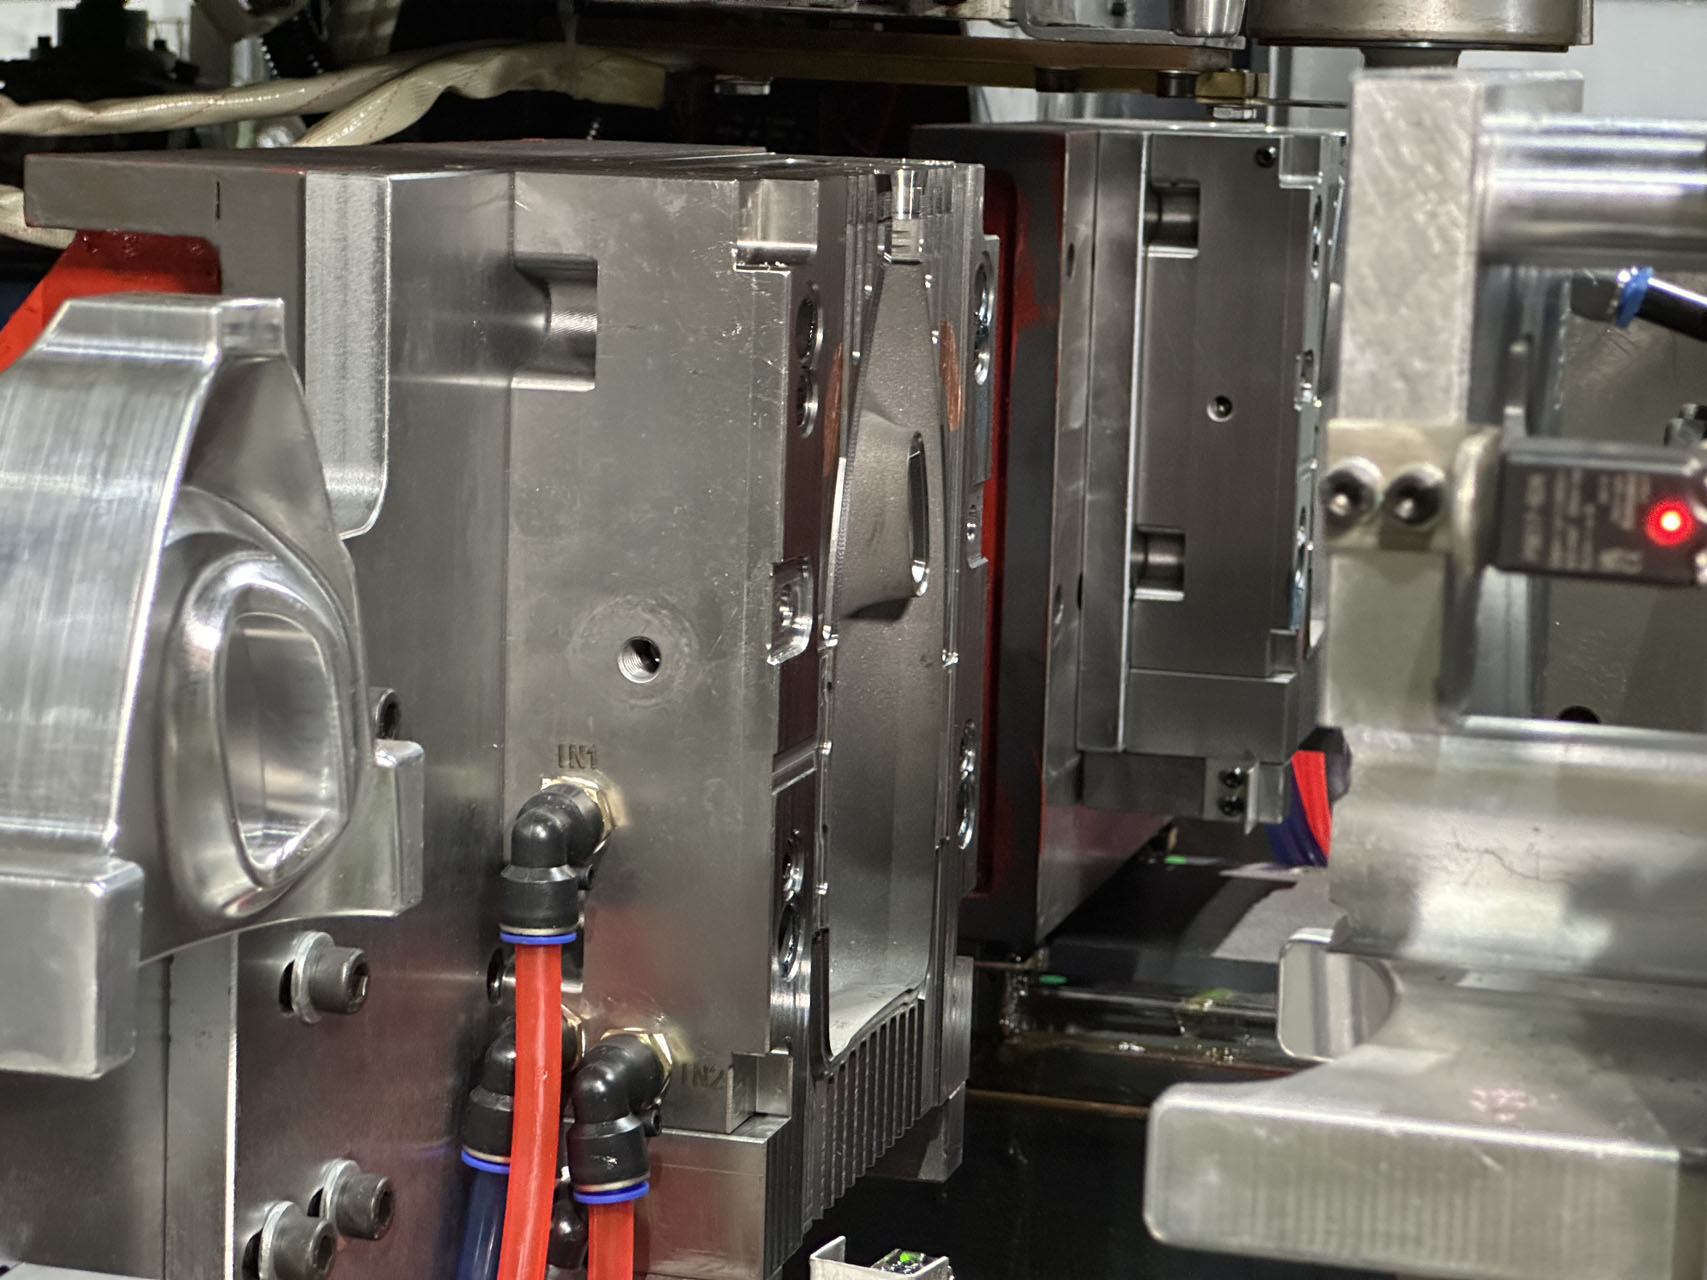
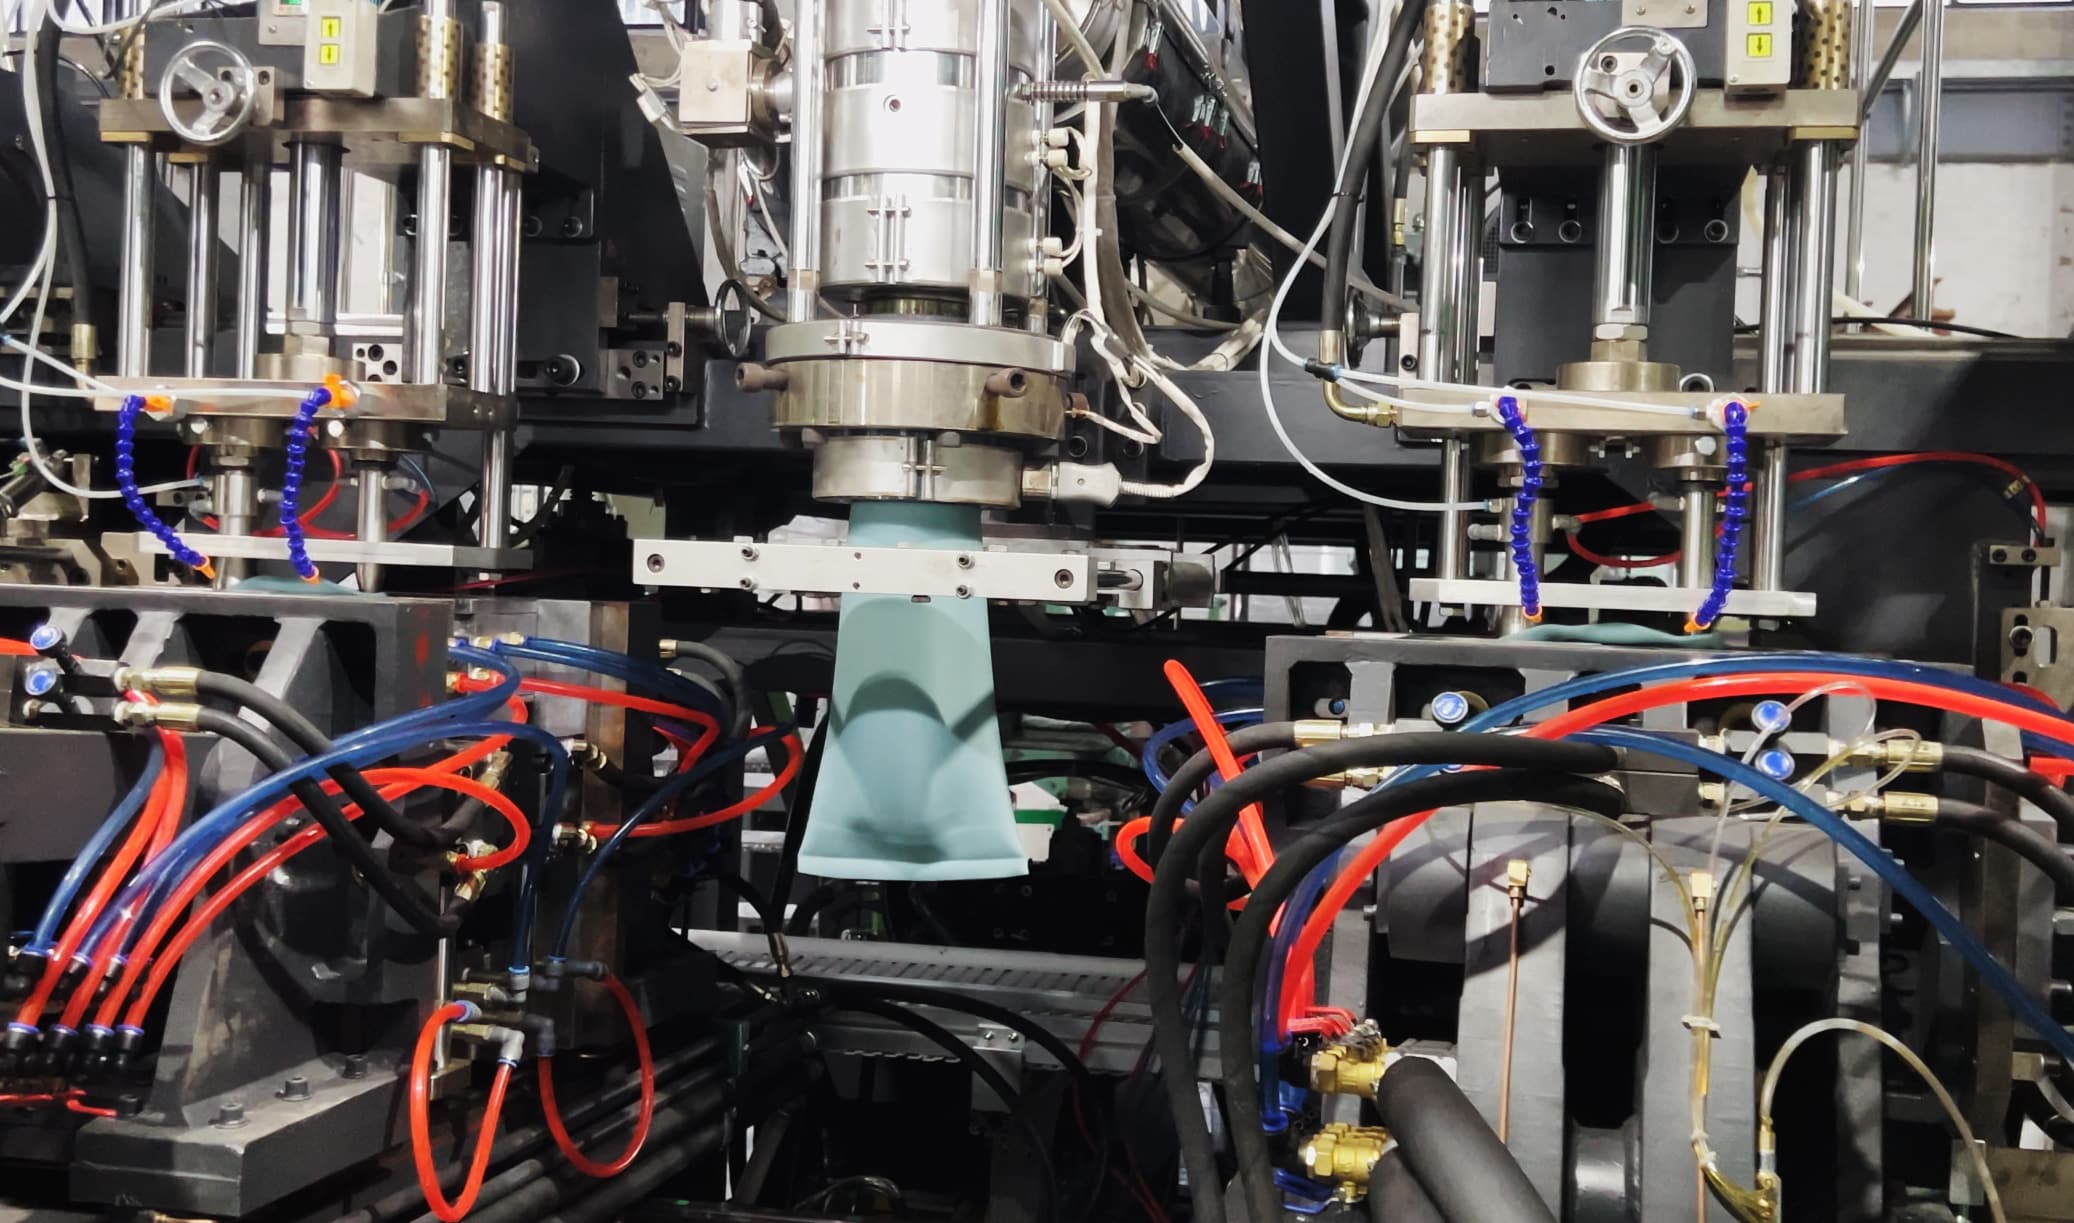
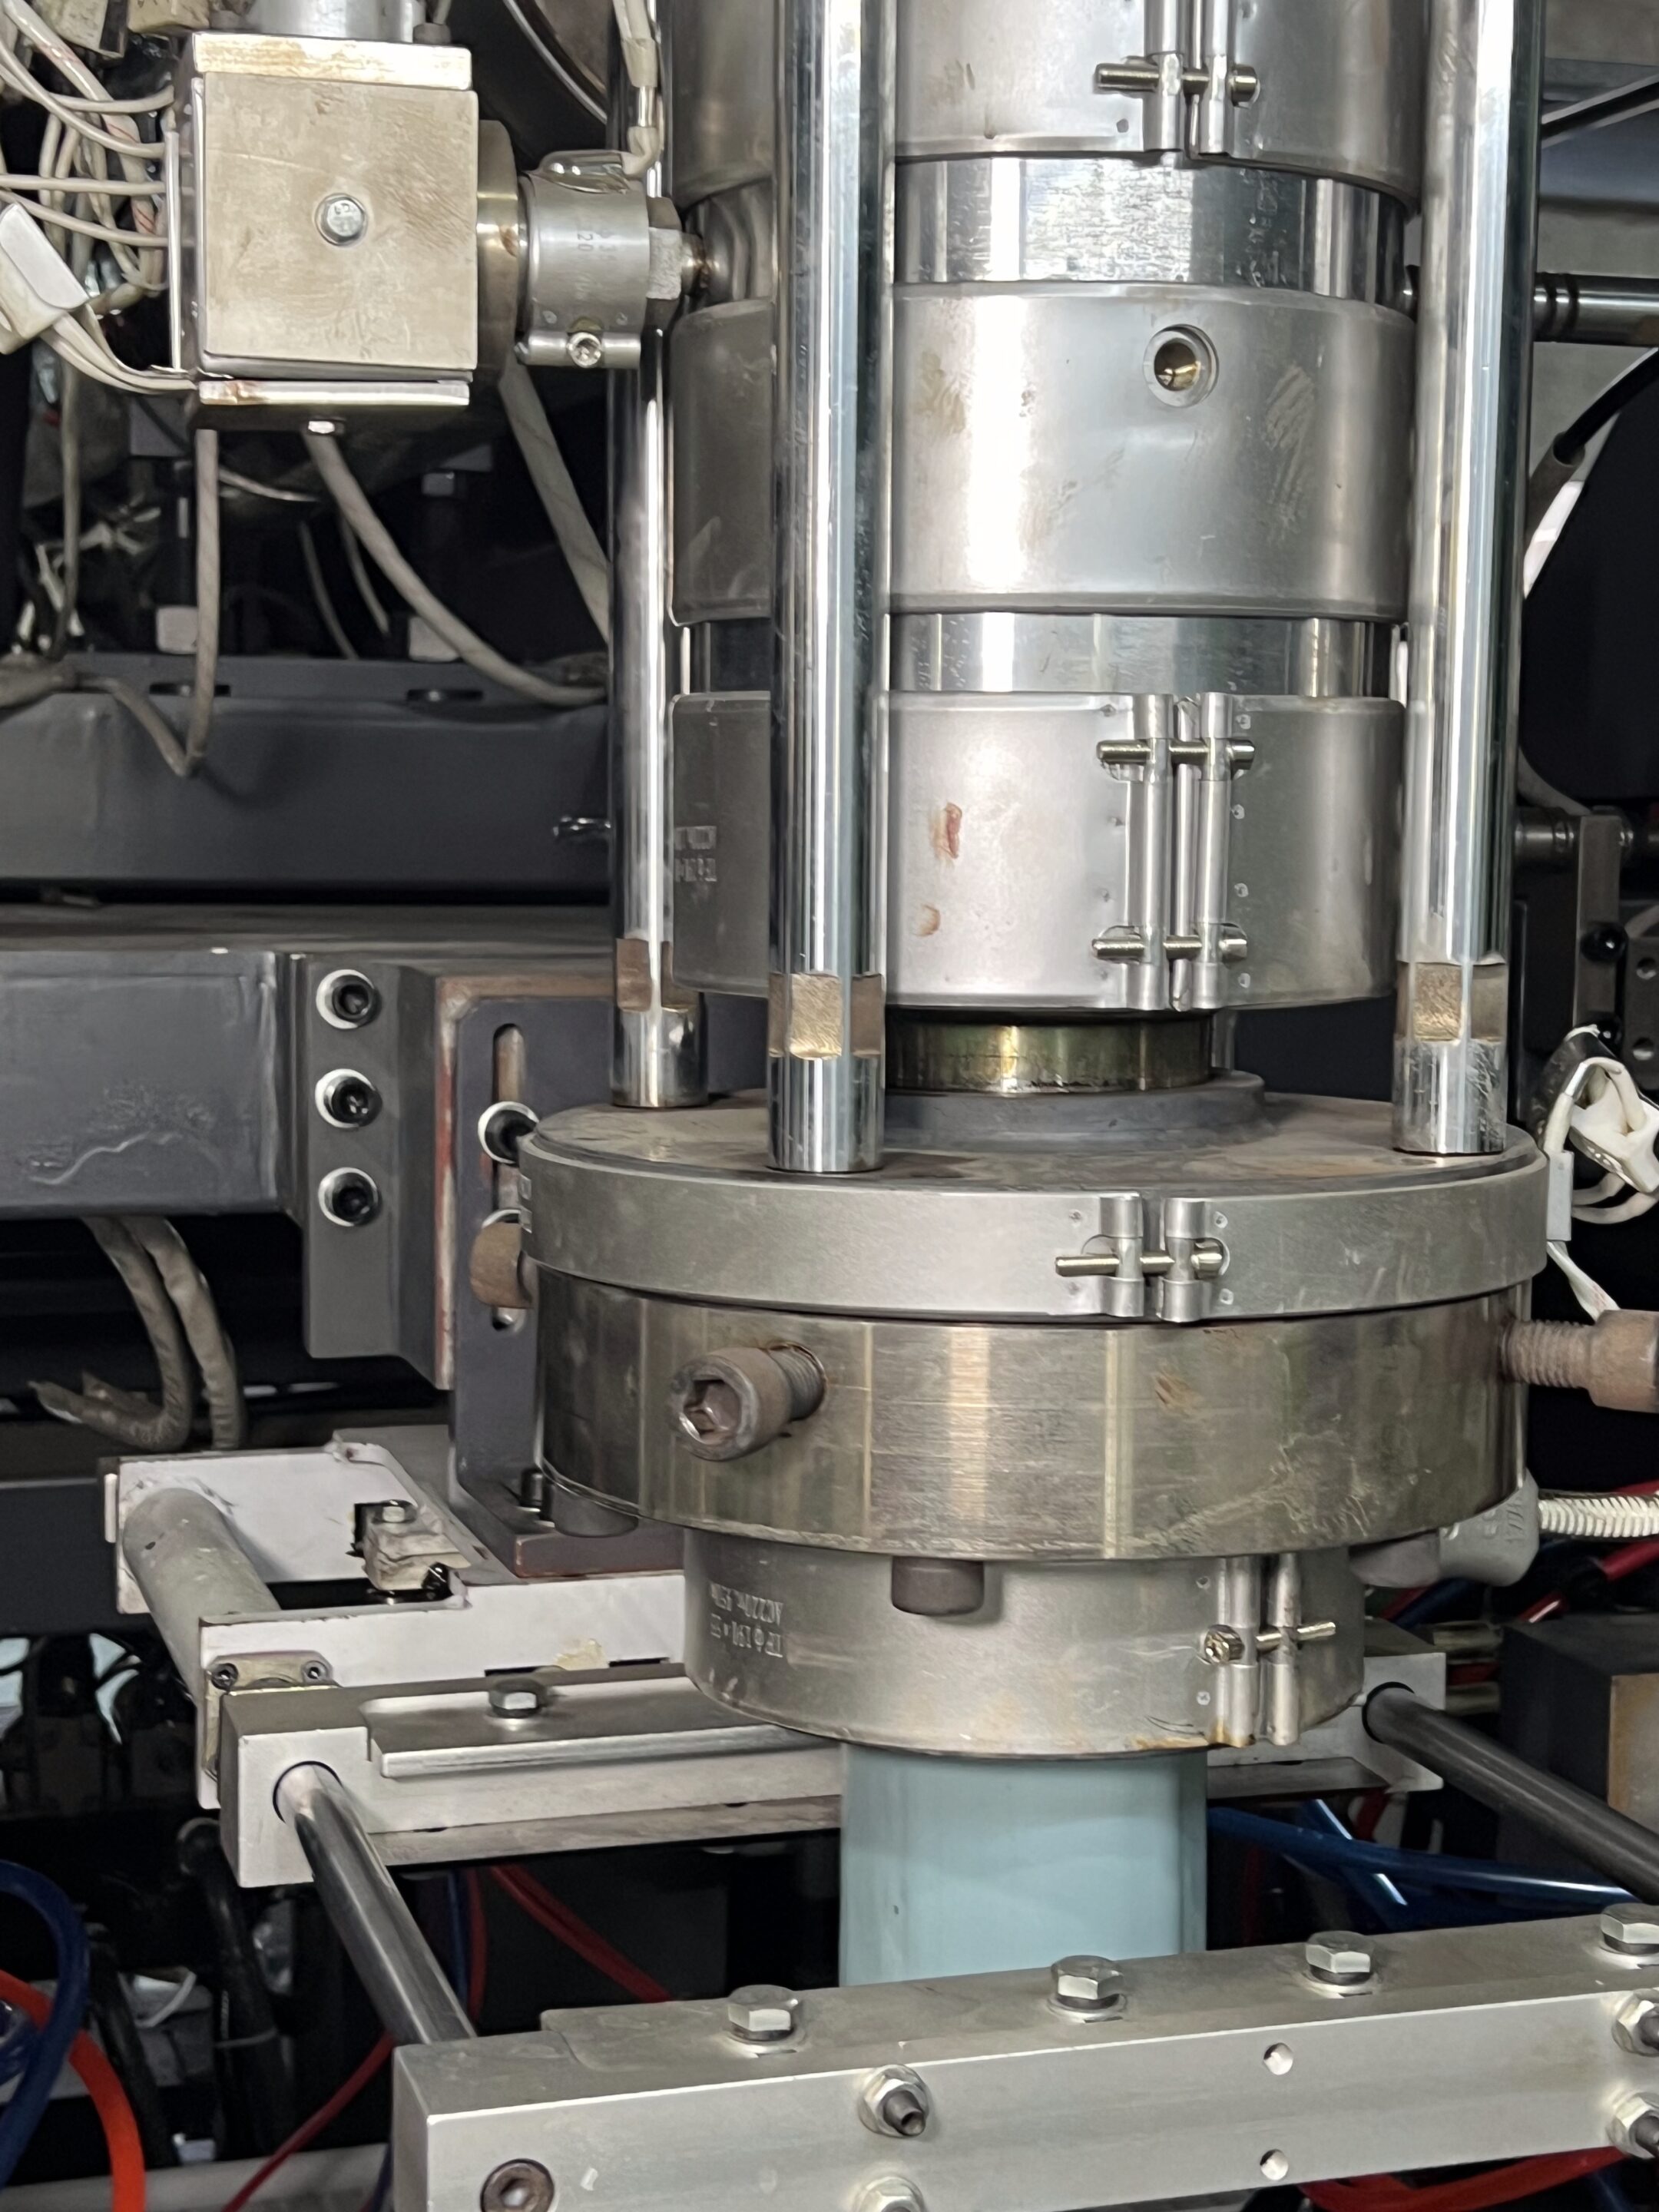
Step 6 — Install the New Blow Molds (EBM & SBM)
EBM Install
- Coaxiality: mold centerline and blow pin seat in line; off-center entries cause leaks and flash.
- Pinch-off: close slowly; look for a continuous land. Fix nicks now. This controls flash height, seal strength, trim feel.
- Neck & flash channel: even knife edge; clear gutters.
- Fastening: seat finger-tight, then cross-pattern torque to chart.
- Servicios: water in/out per tag; air per blow pin spec; pressure hold to confirm no water leaks.
SBM Install
- Neck ring & lock: match finish; inspect the sealing land for high-pressure integrity.
- Bottom height & stretch rod zero: this pair sets base shape and push point; set zero and jog to check contact timing.
- Centering: cavity center to guide pillar line; use a gauge or bar to feel symmetry.
- Fastening & utilities: cross-pattern torque; reconnect cooling and sensors; check for flow and leaks.
- Oven coordination: note any needed zone changes for this bottle later.
Step 7 — Align & Center the Mold
This step saves hours later. I spend 8–12 extra minutes here to avoid chasing weight, flash, or leaks.
EBM Alignment & Parison Centering
- Head concentricity: check uniform mandrel–die gap. Correct with head eccentric adjustment.
- Parison centering: extrude a short parison, close dry, see where the land grabs. Adjust with die eccentric (coarse) and parison thickness program (fine, shoulder/heel zones).
- Vent & pinch-off prints: use thin film to check land pressure prints. Even marks mean uniform clamp and land.
SBM Alignment & Forming Path
- Oven zones reset: map the preform temperature; base slightly hotter for better push.
- Timing & pressure stack: test pre-blow, high blow, exhaust without a preform to verify solenoid timing.
- Stretch rod center & tip: rod tip meets base pad square; correct guide bushing or zero if needed.
- Foot symmetry: first pieces often reveal base tilt fast.
Condition, Dry-Run & Safety Interlocks
- Bring mold and oven to target temperature.
- Run a dry cycle.
- Check clamps, guards, light curtains, e-stops, door interlocks.
- Verify cooling flow and ΔT. Unusual ΔT may mean low flow or blockage.
Trial Run & First-Article Release Criteria
I pull 10–20 pieces and check five things.
- Weight: target ±2% unless spec says otherwise. Weight shows parison/program health fast.
- Dimensions: neck thread, height, major width, key control points.
- Wall-thickness map: 8–12 points (shoulder, mid-body quadrants, heel, base). I want balanced pairs (left/right, front/back).
- Function & integrity: leak test to spec; top-load/side-load; drop if required; closure fit.
- Visual: flash height, parting line quality, haze, scuff, base clarity.
Adjustment Logic — EBM
- Shoulder thick → reduce shoulder time/thickness in parison program.
- Heel thin → increase heel zone or delay thinning near cut.
- Flash high → check pinch-off land and clamp tonnage.
Adjustment Logic — SBM
- Base whitening → base too cold; increase base oven zone or reduce stretch speed.
- Base rocking → adjust stretch rod speed/zero; balance blow timing.
- Panel scuff/haze → reduce high-blow pressure or heat; smooth pressure ramp.
Release: when sample meets weight, fit, wall map, integrity, and visual, I sign the first-article release. If one item is off, I fix it now.
Ramp-Up, Monitoring & Handover
I never jump to full speed. I ramp in two or three steps and watch:
- Scrap rate trend
- Energy per bottle (kWh/kg if available)
- Cooling return temperature stability
- Leak or flash drift
Once stable, I save the recipe with a clear version name (date, weight, resin), update the mold card (torque, center notes, wear), archive the checklist, and hand over to production with a short verbal brief: what we changed, what to watch, and the top two knobs to nudge if X happens.
SMED Quick Wins to Cut Downtime
- Externalize prep: pre-heat/pre-cool molds outside the press.
- Standardize torque: fewer bolt sizes and a posted chart.
- Color & number code water/air lines.
- Shadow board for tools at the machine.
- Two-path workflow: one disconnects/cleans while one stages the new mold/utilities.
- “Ready bin”: O-rings, PTFE, plugs, clamps.
- Short checklists used every time.
- One photo before and after for training and drift control.
If you pick only two, pick externalized prep and standardized torque. They are simple and they stick.
Troubleshooting After a Mold Swap
Use this quick triage when things go sideways.
EBM Issues
Big flash
- Check pinch-off land wear and clamp force first.
- Confirm the parison isn’t drifting into the land.
- Re-level platens if the print shows bias.
Shoulder heavy, base light
- Trim shoulder zone in the parison program.
- Warm shoulder zone slightly; cool base more evenly.
- Re-check head concentricity.
Ovality & seep leaks
- Look for uneven cooling or a blocked channel.
- Verify flow and ΔT side-to-side.
- Clean vent grooves.
Bottle weight drift
- Stabilize melt temperature; fix regrind ratio if it’s bouncing.
- Ensure the recipe is locked on the HMI.
SBM Issues
Haze/whitening
- Preform too cold or stretched too fast.
- Increase base oven zone or reduce stretch speed.
Base asymmetry / rocking
- Stretch rod not centered or wrong zero.
- Check base insert height and rod tip face.
Leaks at neck
- Neck ring face damage or debris.
- Check high-blow seal and timing; verify pre-blow not lifting the ring.
Scuff marks on panels
- Too aggressive high-blow ramp or hot spots.
- Smooth the pressure profile; even the oven zones.
Quality & Hygiene for Food-Grade Lines
- Keep chemicals off any product-contact surface.
- Use food-grade lubricants on moving parts and keep them away from cavities.
- Sanitize tools that touch cavities or neck finishes.
- After change, do a hygiene re-inspection and record it.
- Keep a retain sample with a clear label: date, time, mold code, operator.
Clean shop, clean bottles.
Example Scenario (Numbers Included)
Context. A dairy bottle line. 2-cavity EBM. 1 L HDPE. Two operators and one tech. We change from Bottle A to Bottle B mid-shift and get back to rate fast.
Plan. Pre-heat incoming mold to 40 °C (target 45 °C). Pre-stage water/air with caps. Load Bottle B recipe “B-v4.” Release criteria: 36–37 g weight, leak-free at 0.3 MPa for 30 s, top-load ≥120 N, clean trim, wall map within ±10% at 8 points.
Stop. Purge parison. Cool zones from 180 °C to 150 °C in steps. Home axes. LOTO.
Disconnect & remove. Water out, air out, cap. Loosen and sling. Old mold gets rust-inhibitor wipe.
Install & align. New mold set, cross torque, water/air connected, no leaks. Head concentricity confirmed; parison centered with a dry squeeze. Pinch-off print even.
Trial & tweak. First 10 pieces: 37.6 g avg (slightly heavy). Shoulder thick by 0.2 mm vs target → trim shoulder zone −3% and lower head temp 5 °C. Next 10: 36.9 g avg, balanced walls, leak OK, top-load 125 N.
Release & ramp. Sign off. Ramp to rate over 10 minutes. Scrap during changeover: 24 units. Total downtime: 58 minutes.
Glossary (Plain Words)
- LOTO — A safety method to isolate energy so machines cannot start or move.
- SMED — Single-Minute Exchange of Die. A way to shorten changeovers by doing prep outside machine time.
- Parison — The hot tube of plastic extruded in EBM before the mold closes.
- Pinch-off — The land where the mold halves squeeze the parison shut and seal it.
- Acabado del mástil — The thread and sealing area where a cap fits.
- ΔT — Temperature difference between water in and water out; shows cooling effectiveness.
- Cpk — An index that shows how centered and tight your process is to the spec.
Downloads & Templates (Copy-Paste Checklists)
Mold Change Pre-Check (Universal)
- Incoming mold staged, ports capped, temperature within ±10 °C of target
- Quick-connects labeled and tested
- Torque chart at hand; tools present and working
- Recipe loaded; version named for this bottle
- First-article form printed; acceptance criteria written
- Leak kit on cart (O-rings, PTFE, clamps)
- Safety huddle done; roles assignedDownload:Mold_Change_Pre-Check_Universal_Checklist
First-Article Release Sheet (Short)
- Sample size: ___
- Weight target: ___ g (± ___ %)
- Wall points (8–12): values in mm
- Leak test: pressure ___ MPa, time ___ s → Pass/Fail
- Top-load/side-load: target ___ → Pass/Fail
- Cap fit: Pass/Fail
- Visual: Pass/Fail
- Released by: ___ Time/date: ___Download:First-Article-Release-Sheet-Short
Torque Record (Example)
- Left upper: ___ N·m
- Left lower: ___ N·m
- Right upper: ___ N·m
- Right lower: ___ N·m
- Cross-pattern complete: Yes/NoDownload:Torque_Record_Checklist
EBM Alignment Notes
- Head concentric (Y/N)
- Parison centered (Y/N)
- Pinch-off print even (Y/N)
- Flash channel clear (Y/N)Download:EBM_Alignment_Checklist
SBM Alignment Notes
- Neck ring match (Y/N)
- Stretch rod zero set (Y/N)
- Base pad contact (Y/N)
- Oven profile saved (Y/N)Download:Stretch_Blow_Molding_Alignment_Checklist
Preguntas Frecuentes
How long should a mold change take on EBM vs. SBM?
It depends on cavity count, access, and the team. A focused team can often do 45–90 min for a single-cavity EBM and 60–120 min for a 4–8 cavity SBM insert swap. Track your own baseline and aim for 30–50% faster with SMED.
Do I need to re-validate after replacing blow molds?
For food and regulated products, follow your validation plan. At minimum do a first-article release with weight, wall map, leak test, and fit. If the container or process changed, review downstream packing tests too.
What torque should I use for mold bolts?
Use your machine/mold builder’s chart. If missing, ask engineering for a standard based on bolt size, grade, and lubrication. Never “feel it tight”; record it.
How do I reduce leaks after a swap?
Start at the pinch-off land (EBM) or neck ring face (SBM). Confirm clean, uniform contact. Then check cooling balance and timing. Leaks often trace back to uneven land pressure or poor centering.
When should I re-center the parison vs. adjust pinch-off?
If the bottle is thin on one side or flash is heavy on one side, center the parison first. If flash is high everywhere or seals are weak, inspect the pinch-off and clamp force.
How many samples do I need for release?
Ten is my minimum. Twenty gives a clearer picture of wall balance and weight stability if time allows.
Should I change anything on the compressor side during a swap?
Yes. Check air setpoints and timing for the new bottle, especially on SBM. Right-sizing pressure saves energy and avoids over-driving the part.
Related Resources
Use natural anchor text like “extrusion blow molding machines” and “stretch blow molding machine.” It helps people and search engines follow your logic.
【配图建议:设备页面截图缩略图拼贴】
A Quick Comparison
EBM in one breath: Parison → Mold closes → Blow & cool → Trim. Key risk: parison centering & pinch-off.
Die head for Extrusion blow molding machine
SBM in one breath: Preform reheat → Stretch & blow → Cool → Eject. Key risk: preform heat profile & stretch path.
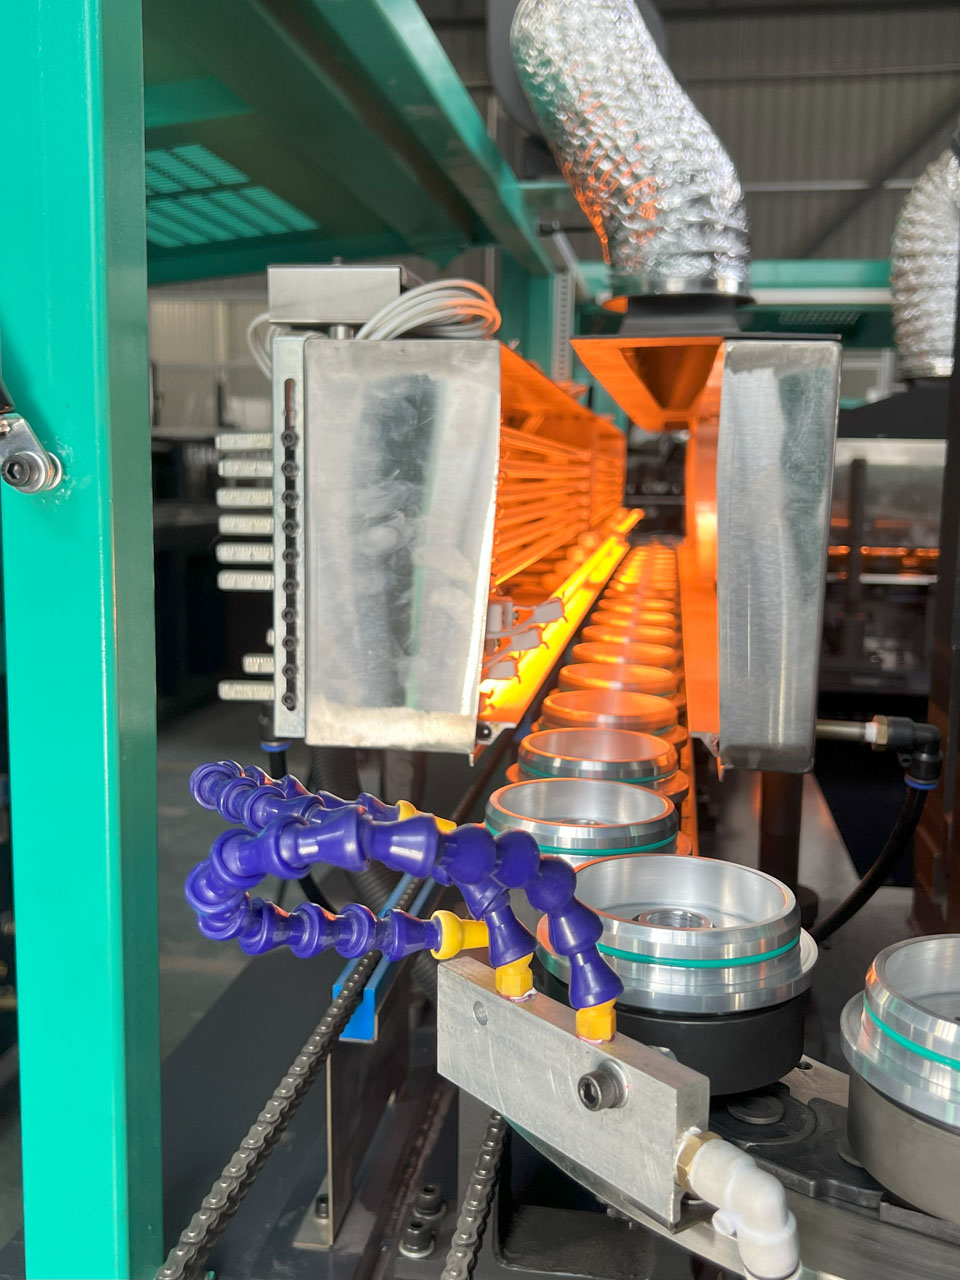
Close-up along the IR heating tunnel where aluminum pucks carry containers under uniform radiant heaters with exhaust ducting.
When in doubt, remember this: EBM manages a floppy tube. SBM manages a hot glassy preform. Different physics. Same need for patience.
What I Measure After Every Change
- Downtime minutes (start → first article OK)
- Scrap pieces during change
- Bottles to stable rate (how long until tweaks stop)
If you track energy, add kWh/kg or kWh/bottle. It shows the cost of chaos and the value of discipline.
Final Checklist
- LOTO applied and verified
- Old mold removed and protected
- New mold installed and torqued to spec
- Utilities connected, no leaks
- Alignment completed (EBM parison centered; SBM stretch path set)
- Dry cycle passed, interlocks OK
- Temperatures stable; cooling ΔT normal
- First sample pulled (10–20 pcs)
- Weight, wall map, leak, fit, visual Pass
- Recipe saved, cards updated, handover done
Closing
Mold changes will never be “fun.” But they can be calm. Keep steps short. Keep tools close. Keep records clean. You will make bottles sooner. And you will sleep better.
::contentReference[oaicite:0]{index=0}


0 Comentarios