


How should I participate remotely in the final inspection of the ALL electric extrusion blow molding machine before shipment?

Investing in a high-end all-electric blow molding machine 1 is a significant capital commitment, and the inability to visit our factory in China shouldn’t force you to fly blind. We understand the anxiety of approving a machine based solely on a video call—what if the servo motors overheat after an hour, or the cycle time is just a “theoretical” number PLC Event Log 2? At our facility, we have refined our remote testing protocols to eliminate these risks. By combining high-definition streaming with real-time data integration, we ensure you see exactly what we see on the shop floor.
To successfully inspect an all-electric extrusion blow molding machine remotely, request a multi-camera setup covering the die head and clamping unit. Require real-time HMI screen sharing to verify cycle times and servo motor load percentages, ensuring the machine meets the agreed 8-hour dry run stability criteria before shipment.
This guide outlines the specific steps and questions you should ask to ensure your remote Factory Acceptance Test 3 (FAT) is as rigorous as an in-person visit.
Will you set up multiple camera angles so I can inspect the parison drop and bottle ejection live?
When we prepare for a client’s remote inspection, we know that a single webcam on a laptop is insufficient for capturing the complex movements of an extrusion blow molding (EBM) process 4. We often find that static cameras miss the critical details of the parison programming. To solve this, we set up a visual network that mimics the human eye’s ability to focus on specific zones.
We mandate a minimum of three synchronized camera angles: a fixed view of the extruder die head for parison control, a high-speed view of the clamping unit, and a mobile camera for close-up component inspection. This setup allows you to verify mechanical movements and bottle ejection quality simultaneously.

The Importance of Visual Architecture
In a remote FAT (rFAT), your eyes are only as good as the camera lenses we deploy. For an all-electric machine, the movements are faster and quieter than hydraulic systems, making visual verification even more critical. We cannot rely on a shaky handheld phone. Instead, we must establish a “Visual Triangle” that covers the three critical zones of the blow molding process.
First, we focus on the Die Head and Parison. This is where quality starts. We position a high-definition camera to look directly at the parison drop zone. You need to see if the parison falls straight or if it curls (which indicates uneven heating or die issues). Because all-electric machines use precise servo control for the parison thickness, any visual “wobble” in the plastic tube suggests the servo is not tuned correctly.
Second, we capture the Clamping Unit. Electric toggles move rapidly. We need a wide-angle view to show the smooth acceleration and deceleration of the platens. If the video frame rate is too low, the motion looks jerky. We ensure our streaming setup can handle the speed so you can verify the “soft-close” feature is working to protect your molds.
H3 – Required Camera Positions for Effective Inspection
To guide your request, here is the standard camera setup we recommend for a thorough evaluation:
| Camera Position | Target Component | What You Are Looking For |
|---|---|---|
| Fixed Cam 1 | Die Head / Nozzle | Straightness of parison drop; absence of die swell or curling. |
| Fixed Cam 2 | Mold / Clamp Area | Smooth toggle locking; verify no “slamming” sounds; precise mold alignment. |
| Mobile Cam | Ejection Chute | Clean bottle ejection; verify the auto-deflashing system removes scrap effectively. |
| Roaming Cam | Electrical Cabinet | Close-ups of servo drive brands (e.g., Siemens/B&R) and checking for loose wiring. |
Finally, the Mobile Roaming Camera is your “detective.” We use this to walk around the machine. You can ask us to zoom in on the water chiller connections, inspect the scrap conveyor belt, or read the serial number on the main servo motor to ensure it matches the Bill of Materials (BOM).
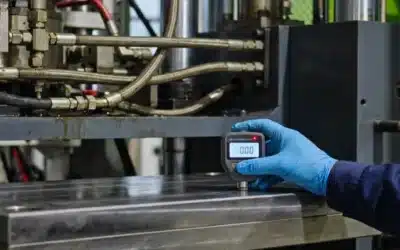
How do we validate the cycle time and bottle weight data in real-time during the video call?
In our experience exporting to North America and Europe, the biggest dispute often arises from “promised” versus “actual” output. Theoretical cycle times look good on paper, but real-world production involves cooling time, mold venting, and robot take-out speeds. We believe the only way to prove performance is through transparent, uneditable data streams, not just a stopwatch held up to a camera.
Validation requires direct HMI screen sharing to view live PLC data rather than relying on stopwatch timing via video. We integrate a dynamic digital checkweigher at the outfeed, streaming real-time bottle weight statistics to your screen to prove the servo-driven parison controller is maintaining precise wall thickness distribution.

Moving Beyond Video Timing
Video feeds often have latency (lag) ranging from 0.5 to 2 seconds depending on internet connections. If you try to time a 10-second cycle using a video feed, your measurement could be off by 10-20%, which is unacceptable for high-volume production.
Instead, we use Direct Screen Sharing of the Human-Machine Interface (HMI) 5. This allows you to see the machine’s internal “brain.” You can watch the digital timers for “Blow Time,” “Exhaust Time,” and “Cycle Complete” tick down in real-time. This data comes directly from the PLC and is accurate to the millisecond.
H3 – Validating the “All-Electric” Advantage
Since you are buying an all-electric machine, you are paying for energy efficiency 6 and precision. How do you verify this remotely? We show you the Servo Load Monitors. On the HMI, we can pull up a graph showing the torque load of the clamping motor.
If the graph shows the motor spiking to 95% load just to close the mold, the motor is undersized or the mechanism is binding. A healthy machine should operate at 60-75% load. This is a critical check that is impossible to do with just a visual video feed.
Weight Consistency and Material Savings
Material cost is your biggest ongoing expense. To prove our machine’s stability, we don’t just weigh one “golden sample.” We recommend setting up a continuous weighing station during the call.
- Step 1: We run the machine for 15 minutes.
- Step 2: Every bottle passes over a digital scale connected to the PC.
- Step 3: You see the weight data populate in an Excel sheet live on screen.
| Metrik | Acceptable Range | What Failure Indicates |
|---|---|---|
| Çevrim Süresi | ± 0.2 seconds | Inconsistent cooling or unstable servo speeds. |
| Bottle Weight | ± 0.5 grams | Parison controller is not responsive; unstable extruder RPM. |
| Servo Load | < 80% Peak | Mechanical friction or undersized motors (risk of overheating). |
| Power Draw | Matches Spec | If higher, the “energy saving” claim is false. |
By analyzing these data points live, you can mathematically prove the machine is ready for production.
Can I request a continuous 8-hour dry run recording to verify stability before the live session?
We often see machines that run perfectly for the first 30 minutes but start to drift as components heat up. This is the “warm-up” risk. When we build machines, we know that servo motors and ball screws change behavior once they reach thermal saturation. To give you peace of mind, we treat the live video call as the final step, not the only step.
A pre-recorded 8-hour continuous dry run is essential to test thermodynamic equilibrium and servo motor endurance. We provide a time-lapsed video with a visible clock and an exported PLC event log, proving the all-electric system operated without overheating, torque alarms, or emergency stops prior to your live inspection.

The Pre-FAT Stability Test
Watching a machine run for 8 hours on a live Zoom call is boring and expensive for your engineering team. However, skipping this long-duration test is dangerous. The solution is an Asynchronous Dry Run.
Before we even schedule the live meeting, we perform a full shift (8-10 hours) simulation. We set the machine to run automatically in “Dry Cycle” mode (moving without plastic) or fully automatic mode with material recycling. We place a digital clock in front of the machine and record a time-lapse video.
H3 – analyzing the “Black Box” Data
The video proves the machine didn’t stop, but the PLC Event Log tells us how it ran. Modern all-electric machines record every single event. We export this log file (usually a .CSV or .PDF) and send it to you.
You should look for:
- Micro-stoppages: Did the machine pause for 30 seconds every hour? (Maybe the operator had to clear a jam).
- Temperature Alarms: Did the extruder heater bands struggle to hold the set point?
- Servo Warnings: Did the drive report “Over-Current” errors?
If the log file is clean and matches the time-lapse video, you know the machine is mechanically sound.
H3 – The Digital Checklist Strategy
To wrap up the stability test, we use a shared digital checklist. We don’t use paper that can be lost or altered. We use a cloud-based sheet (like Google Sheets or a specialized FAT platform) where we upload the evidence.
| Inspection Category | Evidence Required (Pre-FAT) | Doğrulama Yöntemi |
|---|---|---|
| Termal Kararlılık | Temperature graph of extruder zones | Export from PLC (verify < ±2°C fluctuation). |
| Mechanical Endurance | 8-Hour Time-lapse video | Visual check for smooth operation and no human intervention. |
| Safety Logic | E-Stop Activation Log | Timestamp in PLC log showing machine stopped correctly when tested. |
| Oil/Lube System | Auto-Lube Pressure Log | Verify automatic lubrication triggered correctly during the run. |
By reviewing this “Pre-FAT” package önce the live call, we can spend the live session focusing on specific details rather than waiting for the machine to warm up.
Sonuç
Remote inspections effectively validate all-electric EBM machinery when rigorous data protocols replace simple visual observation. By mandating multi-angle cameras, real-time PLC telemetry, and 8-hour stability logs, you ensure your equipment delivers precise performance and reliability before it ever leaves the factory floor.
Dipnotlar
- Explains the advantages and operational principles of full electric blow molding machines. ↩︎
- Explains how PLC data logging and event-triggered logging function in industrial automation. ↩︎
- Provides a comprehensive definition, purpose, and benefits of a Factory Acceptance Test. ↩︎
- Explains the fundamental steps and principles of the extrusion blow molding process. ↩︎
- Defines Human-Machine Interface (HMI) and details its key components and functions. ↩︎
- Authoritative government source (.gov) providing a clear definition and benefits of energy efficiency. ↩︎


0 Yorum