


Ekstrüzyonlu Şişirme Kalıplama Makineniz İçin Doğru Şişirme Kalıplama Kalıbını Seçmek İçin 5 İpucu
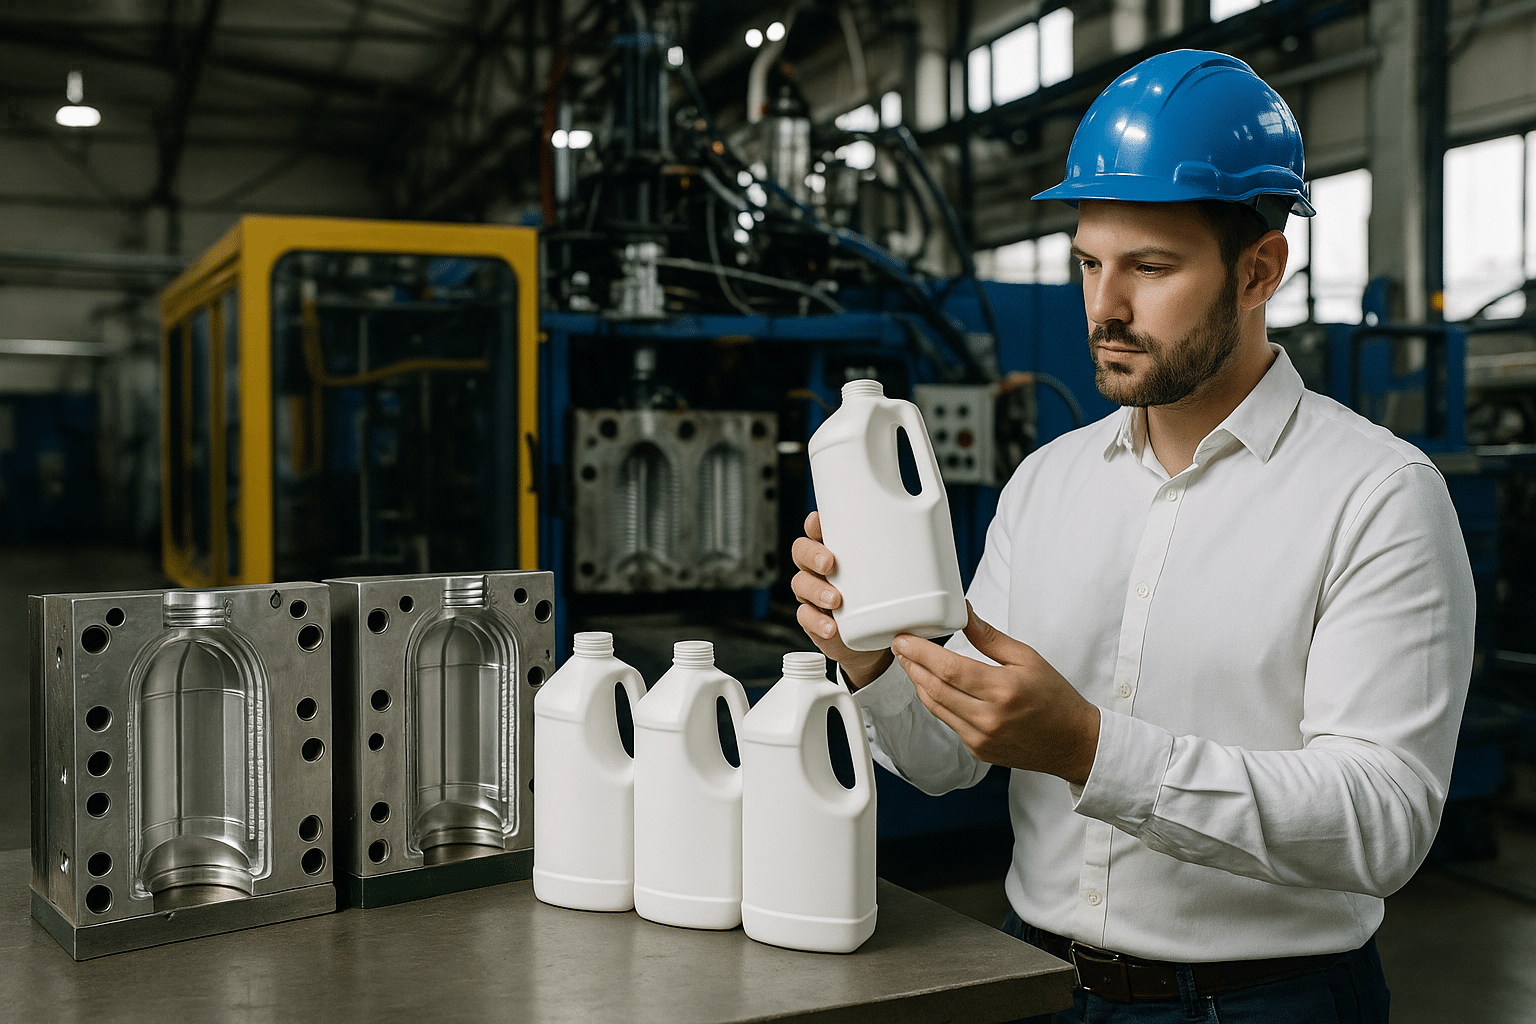
Bir teknisyen, ekstrüzyonlu şişirme kalıplama makinesi üretim hattında kullanılan açık şişirme kalıplarının yanında bitmiş plastik şişeleri inceliyor.
Giriş: Şişirme Kalıp Seçiminizin Önemi
Birçok fabrika, makineleri karşılaştırmak için aylar harcarken, kalıp konusunda karar vermek için sadece birkaç gün ayırıyor.
Gerçekte, şişirme kalıplama kalıbı, üretim hattınızın para kazanıp kazanmayacağına sessizce karar verir.
Kötü tasarlanmış bir şişirme kalıbı şunlara neden olabilir:
- Kimse fark etmeden hurda miktarını artırın.
- Döngü sürenize 2-5 saniye ekleyin.
- Daha yüksek darbe basıncı ve enerji kullanımı sağlayın.
- Müşterilerinizin sizden önce fark edebileceği küçük kusurlar yaratın.
Sağlam ve iyi tasarlanmış bir kalıp şunları korumanıza yardımcı olur:
- Şişe ağırlığı kontrol altında
- Boyun ölçüleri, kapaklama için tolerans dahilindedir.
- Sapları ve köşeleri, düşme ve istifleme testlerinden geçecek kadar sağlamdır.
Yeni bir ürün çeşidi piyasaya sürdüğünüzde, yeni bir HDPE/PP reçine veya PCR karışımına geçtiğinizde veya bir sistem kurduğunuzda kalıplarınızı özellikle yeniden gözden geçirmelisiniz.
yeni ekstrüzyon şişirme kalıplama makinesi.
Eğer modern bir sistem işletiyorsanız ekstrüzyon şişirme Üretim hattında, iyi bir kalıp, vaat edilen çıktı, hurda ve enerji rakamlarına sadece kağıt üzerinde değil, gerçek üretimde de ulaşmanızı sağlayan şeydir.
Ekstrüzyon Şişirme Kalıplama ve Kalıbın Rolünü Anlamak
Temel ekstrüzyon şişirme İşlem basittir:
- Plastik granüller (HDPE, PP, vb.) ekstrüderde eritilir.
- Bu makine, sıcak plastikten içi boş bir tüp çıkarır. Parison olarak adlandırılır.
- Ön kalıp, şişirme kalıbının içine yerleştirilir.
- İçeriye hava üflenir, plastik boşluğa karşı genleşir, soğur ve bir şişe veya bidon haline gelir.
Bu sürecin kalbinde kalıp yer alır. Çift istasyonlu veya akümülatör başlıklı ekstrüzyonlu şişirme kalıplama makinesinde, kalıp, genel bir ön kalıbı tam olarak istediğiniz kap geometrisine dönüştüren unsurdur.
Farklı şişe yapıları, kalıbın tasarım şeklini değiştirir:
- Tek katmanlı şişeler – genellikle standart HDPE veya PP. Odak noktası şudur: duvar kalınlığı kontrolü, Soğutma ve mekanik dayanıklılık.
- Çok katmanlı şişeler – bariyer veya geri dönüştürülmüş katmanlar için kullanılır. Kalıp tasarımı Duvar dağılımını yönetmek ve köşelerde ve tutamaklarda katman ayrılmasını önlemek gerekir.
Kalıp, ekstrüzyon şişirme kalıplama makinenizin işlem aralığına uymuyorsa, eğrilme, düzensiz duvarlar ve kararsız çıktı göreceksiniz.
Şişirme Kalıplama Temelleri: Gerçekte Ne Satın Alıyorsunuz?
Ekstrüzyon şişirme kalıbı sipariş ettiğinizde, sadece bir metal blok satın almıyorsunuz. Hassas bir termal ve mekanik sistem satın alıyorsunuz.
Başlıca işlevsel parçalar şunlardır:
- Boşluk – şişenin dış şeklini ve yüzeyini tanımlar.
- Boyun halkası – boyun kaplamasını, vida dişini ve sızdırmazlık yüzeyini kontrol eder.
- Alt kısım – tabanı, ayakları veya şınavı şekillendirir
- Sıkışma alanı – fazla malzemenin (çapak) sıkıştırılıp kapatıldığı yer
- Soğutma kanalları – kalıptan ısıyı uzaklaştıran su devreleri
Yaygın kalıp malzemeleri ve tipik kullanım alanları:
- Alüminyum – Hızlı işleme, mükemmel ısı transferi, geliştirme ve orta hacimli üretim için ideal.
- Önceden sertleştirilmiş çelik – Daha iyi aşınma direnci, uzun süreli üretim kalıpları için uygundur.
- Bakır veya berilyum bakır uçlar – Yoğun soğutmanın gerekli olduğu yerlerde (kulplar, ağır köşeler, kalın tabanlar) lokal olarak kullanılır.
Ayrıca şunlar arasında da karar vermeniz gerekiyor:
- Tek boşluklu kalıplar – daha esnek, genellikle büyük konteynerler veya sık sık yapılan değişimler için kullanılır.
- Çoklu boşluklu kalıplar – Küçük ve orta boy şişeler için daha yüksek verim, ancak hizalama ve soğutma dengesine daha duyarlı.
Kalıp tasarımı, kullanım alanına göre değişir:
- deterjan bidonları – sağlam sap, iyi istifleme gücü, içe doğru kıvrılmayan düz paneller
- Kozmetik – yüksek yüzey Kalite, Tutarlı renk, özel kapaklar için hassas boyun kesimleri
- Yemeklik yağ – Sağlam taban, sallanma yok, etiket paneli düzgün.
- Kimyasallar – Köşelerde ekstra duvar kalınlığı, sağlam kenar birleştirme, sertifikalı reçine kullanımı
Şişirme kalıplama kalıbı seçtiğinizde, aslında günlük üretim hayatınızın ne kadar istikrarlı olacağını seçmiş olursunuz.
İpucu 1 – Kalıp kataloğundan değil, şişe ve reçineden başlayın.
Doğru sıralama basittir:
Şişe → Reçine → Performans testleri → Kalıp.
Öncelikle, şişe ailenizi net bir şekilde tanımlayın:
- Hacim: 250 ml, 1 L, 5 L vb.
- Sap tipi: 28/410, 38 mm 3-başlangıçlı, özel fiş ve daha fazlası
- Kulplu veya kulpsuz
- Dolgu seviyesi için görüş şeridi veya gözetleme şeridine ihtiyaç duyulmaktadır.
Ardından reçine sisteminize bakın:
- HDPE ve PP karşılaştırması – PP genellikle soğutma ve büzülme konularına daha fazla dikkat gerektirir. HDPE daha toleranslıdır ancak yine de duvar dağılımına karşı hassastır.
- PCR karışımları – Daha yüksek PCR içeriği erime mukavemetini azaltabilir. İnce köşelerin oluşmasını önlemek için kalıp ve parşömen kontrolü bunu telafi etmelidir.
Çevirinizi yapın müşterinin gereksinimlerini kalıba dönüştürmek Özellikler:
- Düşme testleri ve üstten yükleme → kök ve köşe kalınlığını kontrol etme
- Sızıntı sınırları → sıkıştırma tasarımı ve boyun sızdırmazlık yüzeyi Kalite
- Paletler üzerine istifleme → taban tasarımı ve panel rijitliği
Mümkünse, 3 boyutlu şişe tasarımını ve basit simülasyonu erken aşamada dahil edin:
- Şişenin yük altında nasıl deforme olduğunu kontrol edin.
- Etiket alanının düzlüğü ve kavrama konforu üzerine çalışma.
- Çeliği kesmeden önce riskli ince bölgeleri belirleyin.
CAD programında yapılan tek bir başarılı tasarım değişikliği, gerçek üretimde bir kalıp revizyonunun tamamını önleyebilir.
İpucu 2 – Üretim Süresi ve Kalıp Ömrü İçin Kalıp Çeliği, Yüzey ve Soğutma Yöntemini Seçin
Kalıp malzemesi, yüzey işlemesi ve soğutma tasarımı küçük bir ekosistem oluşturur. Bunlar şunları belirler:
- Şişenin kalıptan çıkarılabilecek kadar soğuması ne kadar hızlı gerçekleşebilir?
- Parçanın kalıptan ne kadar kolay çıktığı
- Yüzeyin görünümü – parlak, mat veya portakal kabuğu dokusu.
Birkaç pratik nokta:
- Parlatılmış iç yüzeylere ve dokulu yüzeylere sahip çelik kalıplar, uzun üretim süreçlerine ve yoğun temizliğe dayanıklıdır.
- Alüminyum kalıplar hızlı soğur ancak daha hızlı aşınır. Geliştirme, küçük seri üretim veya düşük aşındırıcı reçineler için uygundurlar.
- Yüzey işlemleri, birleşme ve ayrılma hatlarındaki aşınmaya karşı koruma sağlayabilir.
Soğutma kanalları özel ilgiyi hak ediyor:
- Özellikle kulplar, omuzlar ve kalın tabanlar çevresinde, oyuğun geometrisine uygun şekilde tasarlanmalıdırlar.
- Giriş ve çıkış yerleşiminde ölü bölgelerden kaçınılmalı ve uygun akış sağlanmalıdır.
- Dengesiz soğutma genellikle oval boyunlar, eğrilmiş tabanlar, çökme izleri ve pişirme süresine eklenen fazladan saniyeler şeklinde kendini gösterir.
Her zaman maksimum hızı sağlam kaliteyle dengelemeye çalışıyorsunuz.
Gıda, deterjan ve kozmetik şişeleri için en iyi strateji genellikle, şişe boyun ölçülerinin çok daha istikrarlı olması ve dolum hattında daha az atık oluşması karşılığında, mutlak minimum çevrim süresinden biraz daha yavaş çalışmaktır.
Bu kombinasyon, son saniyenin küçük bir bölümünü kovalamaktan ziyade, şişe başına gerçek maliyetinizi genellikle daha fazla düşürür.
İpucu 3 – Kalıbın Ekstrüzyon Şişirme Kalıplama Makinenizle Uygunluğunu ve Uyumluluğunu Kontrol Edin
İyi yapılmış makinenize uymayan kalıp pahalı bir kağıt ağırlığıdır.
Şişirme kalıplama siparişi vermeden önce lütfen şunları kontrol edin:
- Kalıp tablası boyutu – kalıp tabanı, soğutma bağlantı parçaları ve hortumlar için yeterli boşluk kalacak şekilde rahatça oturacak mı?
- Tie-bar gap and daylight – is there enough room to open, eject, and swap molds easily?
- Clamping stroke – is it sufficient for mold thickness and bottle height?
Then look at the head and tooling configuration of your
ekstrüzyon şişirme makinesi:
- Center distance of die heads versus center distance of cavities
- Neck tooling and blow pins – do they align with the mold and avoid overloading the clamp?
- Head type (continuous vs accumulator) – this affects parison behavior and gate area
If you are re-using old molds on a new machine:
- It can work well when sizes and center distances are similar.
- It becomes risky when the new machine is much larger or smaller, or when clamp design is totally different.
Senin machine supplier should support you with a mold compatibility drawing or layout that shows:
- Maximum mold size and thickness
- Bolt patterns and locating system
- Head and blow pin positions
Having this drawing in hand before cutting steel reduces expensive surprises at commissioning.
İpucu 4 – Hızlı Değişim ve Kolay Bakım İçin Kalıplar Tasarlayın
If your plant runs many SKUs, mold change time is a profit lever. Every hour spent on changeover is lost output.
Look for mold design features that help:
- Standardized backplates and locating elements, so different molds fit the same mounting points
- Quick-connect water and air fittings, so operators do not guess which hose goes where
- Clear cavity labels and engraved bottle codes on the mold
- Access windows or removable covers to clean pinch-offs and vents
Think about mold life planning from day one:
- Estimate expected shot count per year
- Specify polishing and parting line rework procedures
- Order spare inserts for critical wear areas together with the main mold
A simple internal mold inspection checklist can prevent unplanned stops:
- Check parting lines for burrs
- Inspect vents for blockage
- Look for uneven wear on pinch-off edges
- Confirm all cooling circuits have proper flow
Small preventive actions keep your OEE stable and protect your machines from unnecessary stress.
İpucu 5 – Doğru Şişirme Kalıplama Kalıbı Tedarikçisini (veya Makine + Kalıp Ortağını) Seçin
Not all blow molding mold suppliers operate the same way. You want a partner, not just a vendor.
Good questions to ask before you send drawings:
- Which resins and bottle types do they specialize in?
- Do they have experience with extrusion blow molding molds for your neck standards and markets?
- Can they show sample parts and real case references?
A solid blow molding mold proposal should include:
- Steel grade and hardness
- Tolerances for key dimensions (neck, handle, base)
- Cooling concept, including number of circuits and flow
- Sampling plan and number of sample bottles
- Lead time for design, machining, and testing
Insist on sample bottles from a real extrusion blow molding machine, and a test report with cycle time, scrap rate, and key dimensions.
Also protect your bottle design and engineering data:
- Use NDAs that clearly cover CAD data and 3D models
- Clarify where data is stored, who has access, and how long it is kept
In many projects, it makes more sense to choose a combined machine and mold partner that understands both sides of the system instead of separate suppliers.
Pek çok işletme neden Lekamachin'den Makine + Kalıp Paketi tercih ediyor?
Many problems during commissioning come from a gap between the machine team and the mold team. When the bottle is not good, each side can blame the other.
A machine and mold package reduces that friction:
- One technical team responsible for both extruder and mold
- One factory acceptance test where machine and mold run together
- Less finger-pointing if cycle time, wall distribution, or leaks are not yet ideal
With a partner like Lekamachine, you can bundle:
- A new extrusion blow molding line
- The first HDPE bottle mold set
- Bottle optimization support during trials
- Options for leak testing, conveyors, and packing automation
Lekamachine works with trusted mold partners and offers full customization:
- Mold design based on your drawings or sample bottles
- Container size range from cosmetic bottles to industrial jerrycans
- Automation options around the machine for higher throughput
This kind of packaged solution is especially useful when you set up a new plant, take on a new OEM project with strict KPIs, or plan a major SKU shift and want to reset your total cost of ownership, not just your hardware.
Şişirme Kalıp Seçiminin Toplam Sahip Olma Maliyetini (TCO) Nasıl Etkilediği
Mold cost is visible on the quotation. The hidden costs show up month after month.
A cheap mold can:
- Raise scrap by several percentage points because of flashing, leaks, or unstable dimensions
- Add extra seconds to cycle time due to weak cooling
- Force operators to slow the machine to keep quality under control
This affects your TCO through:
- Extra resin loss, gram by gram
- Higher energy use per kilogram of plastic
- More labor time spent adjusting settings instead of running smoothly
A better mold, matched to your extrusion blow molding machine, often pays back in six to eighteen months through lower scrap, shorter cycles, and fewer unplanned stops.
When you calculate ROI for a new extrusion blow molding machine, include mold performance in the model:
- Assume realistic scrap rates for different mold quality levels
- Use measured kWh/kg and cycle time from trials, not just catalogue numbers
- Factor in mold life and expected rework costs
This makes your procurement decision more honest and more strategic.
Ekstrüzyon Şişirme Kalıplama Hatlarında Sık Görülen Kalıp Kaynaklı Hatalar
Most plants see similar mold-related problems on their lines. Typical issues include:
- Thin handles and weak corners that fail drop tests or deform under load
- Non-uniform wall thickness where one side of the bottle looks softer or panels in
- Short shots, where material cannot reach all areas
- Excessive flash and high trim waste at the pinch-off
- Leaks along the pinch-off due to worn or poorly machined edges
- Neck dimension problems that cause capping and sealing issues on the filling line
Not every problem comes from the mold itself. Often, there is a mix of:
- Mold design choices such as cooling, venting, and cavity geometry
- Process settings such as parison programming, blow pressure, cooling time, and head temperature
The best approach is to buy a robust mold and work with a supplier who will also help you tune the process window on your actual machine.
Bir Sonraki Şişirme Kalıp Siparişinizi Vermeden Önce Pratik Kontrol Listesi
Before you send a request for quotation, prepare a concise but complete package.
Bottle information
- 3D model or detailed drawings
- Volume and target weight
- Neck finish and closure type
- Handle, grip areas, label panels
- Required tests: drop, top-load, leakage, stacking
Resin and process
- HDPE/PP grade and melt index
- PCR ratio or special additives
- Target cycle time and expected output
- Leak test method and limits
Machine information
- Brand and model of your extrusion blow molding machine
- Die head type and number of heads
- Center distances and station layout
- Clamping force and platen dimensions
Quality and documentation
- Steel specification and hardness
- Tolerance list for critical dimensions
- Sample quantity and acceptance criteria
- Factory and site acceptance test conditions if the mold is tested at the supplier
Internal sign-off
- Who approves bottle drawings
- Who signs off mold drawings
- Who validates sample bottles from technical and commercial sides
A structured checklist speeds up the quoting process and reduces misunderstandings.
Örnek Uygulama: Lekamachine ile Kalıp + Makine Paketinin Yükseltilmesi
Imagine a plant running HDPE jerrycans for chemicals.
The symptoms:
- High scrap from thin handle areas and leaking corners
- Slower cycle time than expected
- Operators constantly tweaking settings to keep quality under control
After moving to a new extrusion blow molding machine and a redesigned blow molding mold package, two things changed:
- Wall distribution was optimized in the mold and parison program, so handles and corners stayed within tolerance.
- Cooling layout in the mold and water circuits on the machine were improved, cutting several seconds from the cooling phase.
The results:
- Scrap rate dropped significantly
- Energy per bottle went down
- The line ran at a higher, but still stable, speed
These are the kinds of outcomes you want to replicate when you plan your next extrusion şişirme kalıplama project.
Sıkça Sorulan Sorular: Ekstrüzyonlu Şişirme Kalıplama Makineleri için Şişirme Kalıpları
How long does an extrusion blow molding mold normally last?
With proper steel, cooling, and maintenance, a production mold can run several million cycles. Exact life depends on resin abrasiveness, cleaning methods, and how often the mold is handled.
What is a typical lead time for a new HDPE bottle mold set?
Typical lead times range from 6 to 12 weeks from drawing approval to sampling, depending on complexity and the supplier’s workload.
Can old molds be adapted to a new extrusion blow molding machine from a different brand?
Sometimes yes, with new backplates and interface parts. It becomes less economical when head layout and clamping concept are very different.
What information do mold designers need to quote accurately?
Bottle drawings or 3D models, resin details, expected output, and your machine layout. The more precise you are, the fewer surprise costs later.
When should I stop repairing an old mold and invest in a new one?
When parting lines, pinch-offs, and neck areas need constant rework, scrap remains high, or the mold cannot support new lightweight targets, a fresh design usually pays back faster than another repair.
Lekamachine Hakkında: Bu Ekip Doğru Kalıbı Seçmenize Nasıl Yardımcı Olabilir?
Lekamachine focuses on extrusion blow molding machines and stretch blow molding machines for HDPE, PP, PETG, and related materials, serving food, cosmetics, household, and industrial packaging markets.
Key strengths that matter when you pick a mold partner:
- Over 20 years of experience in blow molding technology and custom bottle projects
- Full customization, including mold design, container size, and automation packages
- Customers in many countries, with real-world feedback on scrap, energy, and uptime across different markets
If you already have a bottle drawing or sample, you can share:
- Target bottle weight
- Resin grade
- Daily or monthly volume
From there, Lekamachine can suggest a matched extrusion blow molding machine and blow molding mold package and help you evaluate the real payback, not just the initial price.
When your mold and machine are designed to work as one system, every shift on the shop floor becomes easier.


0 Yorum