


How Should I Evaluate the Appearance Quality of Transparent Products Produced by an All-Electric Extrusion Blow Molding Machine?

At our factory, we know that clear bottles reveal every hidden flaw. Poor clarity ruins brand perception instantly. You need a strict inspection strategy to avoid costly rejections.
To evaluate transparent products from all-electric machines, prioritize detecting black specks and silver streaks caused by moisture or degradation. Inspect for flow lines using bright back-lighting and verify that the mold has an SPI A-1 diamond finish. Use a polariscope to identify hidden stress patterns that affect durability.
Here is exactly what you need to look for during a sample run to ensure your bottles look like glass.
What Specific Defects Like Flow Lines or Black Specks Should I Look For in Sample Runs?
We often see clients reject entire batches due to microscopic flaws that were missed early on. Defects like black specks hurt shelf appeal. You must catch them immediately during the trial.
You should look for black specks indicating carbonized material and unmelts that signal poor plasticization. Check for splay or silver streaks caused by moisture, and examine the bottle for vertical die lines using back-lighting. These defects confirm if your resin drying and extrusion processes are stable.

When we run initial tests on a new machine, we follow a strict hierarchy of defect identification. The process of moldagem por extrusão e sopro 1 requires precise control when handling clear materials. Unlike opaque HDPE, transparent resins 2 like PC, PETG, and PVC are unforgiving and do not hide process instability. You need to break your inspection down into three critical categories: material degradation, moisture issues, and mechanical scarring.
Identifying Material Degradation
The most common "showstopper" defect is the Black Speck. These are tiny particles of carbonized plastic. In our experience, these usually come from "dead spots" in the extrusion die head where material stagnates, burns, and then releases into the flow. If you see these, the die head design may be poor, or the machine was not purged correctly.
Another issue is "Unmelts" or Gels. These look like clear fish-eyes or lumps in the bottle wall. They indicate that the screw is not generating enough shear heat to fully melt the polymer.
Moisture-Induced Defects
Transparent materials are often hygroscopic 3. If the drying process fails to reach the critical moisture content threshold (typically <0.02%), you will see "Splay" ou Silver Streaks. These look like splash marks or streaks of bubbles. Even slight moisture causes cloudiness. If your sample run looks hazy, check the dryer immediately.
Surface Texture and Lighting
You cannot rely on standard room lighting. We use high-intensity back-lighting (often 1,000 lux) to find Linhas de corte. These are continuous vertical scratches caused by a dirty or damaged die tip. On a white bottle, you might miss them. On a clear bottle, they look like cracks.
Table 1: Common Transparent Defects and Root Causes
| Defect Name | Appearance | Likely Root Cause | Ação necessária |
|---|---|---|---|
| Black Specks | Dark, burnt particles | Dead spots in die head / Carbon buildup | Purge machine; Polish die head flow channels. |
| Silver Streaks (Splay) | White, feathery streaks | Moisture in resin (>0.02%) | Check desiccant dryer performance. |
| Unmelts (Gels) | Clear lumps / Fish-eyes | Low melt temperature / Low screw shear | Increase back pressure; Check heater bands. |
| Linhas de corte | Vertical surface scratches | Damaged or dirty die tooling | Clean die lips with brass tools; Polish die tip. |
How Does the All-Electric Screw Design Affect the Clarity and Plasticization of Materials Like PETG or PC?
When we engineer screws for clear resins, precision is key. Standard screws often cause haziness or burning. You cannot risk poor homogeneity in high-end cosmetic or medical bottles.
All-electric screw design affects clarity by determining melt homogeneity and shear heat levels. A barrier screw with a low-shear mixing section prevents thermal striations and yellowing in sensitive materials like PC. Proper design ensures uniform melting without overheating, which is critical for maintaining high optical transmission rates.
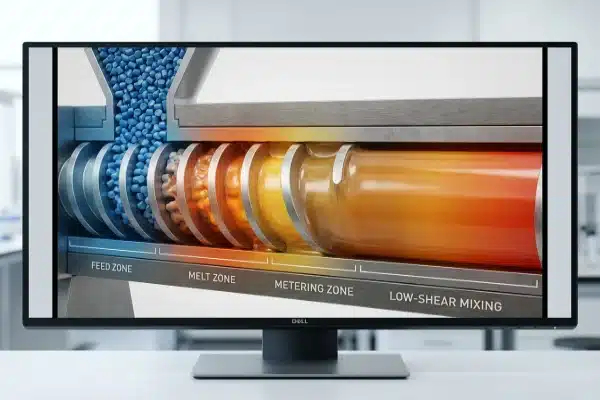
The heart of optical quality lies inside the barrel. If you use a general-purpose screw for transparent materials, you will likely face quality issues. At our facility, we match the screw geometry specifically to the resin’s thermal sensitivity.
The Importance of Low-Shear Mixing
Materials like Polycarbonate (PC) and PETG are heat-sensitive. If the screw generates too much friction (shear heat), the material degrades and turns yellow. This is called "Yellowing."
However, if the mixing is too gentle, the melt temperature will not be uniform. This leads to "Thermal Striations." These appear as wavy optical distortions in the bottle. It happens because hotter and cooler streams of plastic are flowing side-by-side. We recommend a Barrier Screw 4 design. This design separates the solid bed from the melt pool, ensuring that only fully melted plastic moves forward. It must have a low-shear mixing section to homogenize the temperature without burning the plastic.
Servo "Cogging" and Bamboo Lines
This is a specific issue with all-electric machines. If the servo motor driving the extruder is not tuned perfectly, it can experience torque ripples or "cogging" at low speeds.
This creates rhythmic pulsations in the extrusion. On the finished bottle, these look like faint horizontal rings, often called "Bamboo Lines." You need to verify that the machine’s servo drive parameters are optimized for smooth low-speed torque.
Static and Dust Contamination
All-electric machines are cleaner than hydraulic ones because there is no oil mist. However, the air is drier, which creates immense static electricity. The plastic parison acts like a magnet for dust.
If you see dust on your clear bottles, it is not always a material issue. It is often an environmental one. We suggest installing Active Ionizing Bars 5 near the parison head to neutralize static charges and prevent airborne dust from sticking to the hot plastic.
Table 2: Screw Design Features and Optical Results
| Screw Feature | Função | Impact on Transparent Product |
|---|---|---|
| Barrier Flight | Separates solids from melt | Prevents unmelts/gels; Improves clarity. |
| Low-Shear Mixer | Blends melt gently | Reduces thermal striations; Prevents yellowing. |
| High L/D Ratio (24:1+) | More residence time | Better melt uniformity; consistent viscosity. |
| Chrome Plating | Smooth surface | Reduces friction/degradation; Easier color changes. |
Can I Request a Trial Run with My Specific Transparent Resin to Verify Optical Quality?
We always encourage testing before shipping. Using substitute materials hides potential failures. You need proof that the machine handles your specific resin formula and viscosity.
Yes, you should request a trial run using your specific resin to verify optical quality. This confirms the machine handles the material’s viscosity and drying requirements without creating haze or yellowing. A trial run reveals if the heating control and screw design match your specific polymer chemistry.

Requesting a trial run is standard procedure, but you need to know what to test. Simply watching the machine run is not enough. You need to validate the process window.
Setting Baseline Standards (Golden Samples)
Before the trial, agree on what constitutes a "pass." We advise using quantitative metrics. Use a Haze Meter 6 (following ASTM D1003 standards). For premium transparent products, you typically want a haze value of less than 5%.
If the reading is above 5%, the product will look cloudy on the shelf. This baseline helps you avoid arguments about whether a bottle is "clear enough."
Checking for "Zipper" Effects
During the trial, pay attention to the bottle’s profile changes (e.g., from the neck to the shoulder). All-electric machines use servo motors for Controle de Espessura das Paredes 7.
If the servo resolution is low, thickness changes will not be smooth. They will look like sharp steps or rings, known as "Zipper lines" ou "Optical Distortion Rings."
Ask our technicians to run the machine at full production speed. Sometimes servos perform well at slow speeds but lose accuracy when running fast. You need to see the machine perform at your target cycle time.
Polarized Stress Analysis
Visual inspection is limited. We highly recommend bringing or requesting a Polariscope 8. This tool uses polarized light to show internal stress in the plastic.
When you view the bottle through a polariscope, you might see rainbow patterns.
- Minimal patterns: Good. The process is stable.
- Bright, chaotic rainbows: Bad. This indicates "frozen-in stress."
High residual stress means the bottle might crack later (delayed failure), even if it looks perfect today. This usually means the mold cooling is too aggressive or the blowing pressure is too high.
Table 3: Trial Run Validation Checklist
| Test Step | Observation Goal | Acceptance Criteria |
|---|---|---|
| Haze Measurement | Quantify cloudiness | ASTM D1003 Haze < 5% |
| Polariscope Check | Detect residual stress | No concentrated rainbow patterns |
| Speed Test | Check servo response | No "Zipper" lines at full speed |
| 2-Hour Run | Thermal stability | No yellowing after 2 hours of running |
How Do I Ensure the Mold Polishing Level Is Sufficient for High-Gloss Transparent Bottles?
In our mold workshop, we treat polishing like jewelry making. A rough mold destroys clarity immediately. You cannot achieve glass-like finishes with standard tooling methods.
To ensure high-gloss quality, confirm that the mold cavity finish is specified to SPI A-1 or A-2 Diamond Grade Polish. Lower grades like B-1 paper finish transfer microscopic textures that diffuse light, making clear resin appear cloudy. High polishing prevents surface scattering and maximizes transparency.

The mold surface prints directly onto the plastic. If the steel has microscopic scratches, the plastic will have them too. These scratches diffuse light, making a clear resin look milky.
Understanding SPI Ratings
The Society of the Plastics Industry (SPI) has standard grades for mold finishes.
- SPI A-1 9 (Grade #3 Diamond): This is a mirror finish. It is essential for high-end cosmetic bottles and optical parts. It is expensive but necessary for true transparency.
- SPI A-2 (Grade #6 Diamond): Very high gloss, suitable for most clear consumer packaging.
- SPI B-1 (600 Grit Paper): This is smooth to the touch but not a mirror. If you use this for a clear bottle, it will look slightly dull or satin.
We always verify the polishing grade before cutting steel. Upgrading the polish later is difficult and costly.
Maintenance of Polished Molds
A high-gloss mold is delicate. During production, you must be careful with cleaning. Using abrasive pads or harsh chemicals can ruin the A-1 finish in seconds.
We advise using only non-abrasive cleaners and soft cotton cloths. Also, watch out for "plate-out." Some additives in the plastic can leave a waxy residue on the mold surface. This residue clouds the bottle. If you see clarity dropping over time, the mold likely needs cleaning.
Cooling System Impact
Polishing is only half the battle. The cooling channels inside the mold must be efficient.
If the mold cools unevenly, the plastic will warp. Warpage changes how light passes through the bottle, creating Optical Distortion.
Use thermal imaging cameras 10 during the trial to ensure the mold face temperature is uniform. Hot spots will cause the plastic to shrink differently, ruining the perfect shape you paid for.
Conclusão
Evaluating clear bottles requires checking screws, molds, and process stability. We ensure every machine passes these strict optical standards before delivery.
Notas de rodapé
1. Overview of extrusion blow molding principles and machinery. ↩︎
2. Properties of Polycarbonate (PC) and other transparent thermoplastics. ↩︎
3. Guide to drying hygroscopic polymers to prevent defects. ↩︎
4. Benefits of barrier screw designs for melt uniformity. ↩︎
5. Solutions for controlling static electricity in plastic manufacturing. ↩︎
6. Standard test methods for haze and luminous transmittance. ↩︎
7. Role of parison programming in controlling wall thickness. ↩︎
8. Using polariscopes to detect residual stress in plastics. ↩︎
9. Comparison of SPI mold surface finish standards. ↩︎
10. Using thermal imaging to detect cooling issues in molds. ↩︎


0 comentários