


Cara Memproduksi Botol Agrokimia yang Aman: Panduan Lengkap EBM
You worry about chemical leaks. I see this fear in many of my clients. Dealing with hazardous pesticides or fertilizers means one small crack can cost you a fortune in lawsuits and reputation. You want a jalur produksi that is safe, fast, and profitable.
To manufacture agrochemical bottles, you use Cetakan Pukulan Ekstrusi (EBM). This process melts HDPE pellets, forms a hollow tube called a parison, and clamps it into a mold. Air pressure blows the plastic against the cold mold walls to form the bottle. It is the standard for creating strong, chemically resistant containers.

This sounds simple on paper. But in reality, there are hundreds of variables. If your temperature is off by a few degrees, your bottles might fail the drop test. If your screw design is wrong, you waste expensive material. In this guide, I will walk you through exactly how to set up your process. I will share the insights I have gained from helping factory owners install over 1,000 modern worldwide. Let’s make sure your bottles are as tough as the chemicals inside them.
How can I ensure my agrochemical bottles meet industry safety and compliance standards?
Safety is not just a rule. It is the only way to stay in business. If a bottle of weed killer leaks on a store shelf or in a farmer’s truck, you are responsible. You need to know your bottles can handle the stress.
You ensure safety by using High-Density Polyethylene (HDPE) with a minimum wall thickness of 1mm. This material provides the necessary chemical resistance to prevent leaching. You must also perform rigorous vacuum leak testing and drop testing to confirm the container integrity before it leaves your factory.

This cross-sectioned HDPE bottle illustrates the wall thickness and neck geometry commonly produced on an extrusion blow molding machine for agrochemical packaging.
The Critical Role of HDPE
When I talk to clients about agrochemicals, the first thing we discuss is the material. You cannot use just any plastic. Agrochemicals are aggressive. They will eat through standard plastics or cause them to soften and collapse. This is why we almost strictly use HDPE (High-Density Polyethylene).
HDPE is tough. It has a high strength-to-density ratio. This means it creates a barrier that aggressive chemicals cannot easily cross. In my experience, the wall thickness is where many produsen try to cut costs, and that is a mistake. For dangerous chemicals, you need a minimum wall thickness of 1mm. If you go thinner to save a few cents on resin, you risk the structural integrity of the entire bottle.
Another aspect is “leaching.” Leaching happens when the chemical inside the bottle starts to migrate through the plastic wall to the outside. It might not look like a leak, but it contaminates the outside of the bottle. HDPE is excellent at stopping this. However, for extremely volatile chemicals, we might look at fluorination or co-extrusion, which I will discuss later.
Testing Protocols You Cannot Skip
You cannot just produce a bottle and assume it is good. In my factory visits, I advise implementing a strict kualitas control loop. Here are the non-negotiables:
- Drop Testing: Fill the bottle, freeze it (sometimes), and drop it from a specific height. If it cracks, your parison programming is likely wrong.
- Stack Testing: Agrochemical bottles are stacked high on pallets. Your bottle needs strong “top load” strength so the bottom bottles don’t crush.
- Leak Testing: Every single bottle should go through an automated leak tester on the conveyor. It uses air pressure to check for microscopic pinholes.
I remember a client in Indonesia who skipped the stack test to save time. Two months later, he had a warehouse full of crushed inventory because the bottom layer gave out in the heat. Do not skip these steps.
What are the key steps I should follow in the extrusion blow molding process for agrochemical bottles?
You might have seen videos of machines running fast. It looks mesmerizing. But if you don’t understand the physics happening inside the machine, you will struggle to get consistent kualitas. You need to control the flow.
The EBM process involves heating HDPE pellets with a masterbatch in an extruder to create a uniform melt. This fluid is pushed through a die head to form a parison. The mold closes around it, air is injected at 0.21-0.62 MPa to expand it, and the bottle is cooled before ejection.
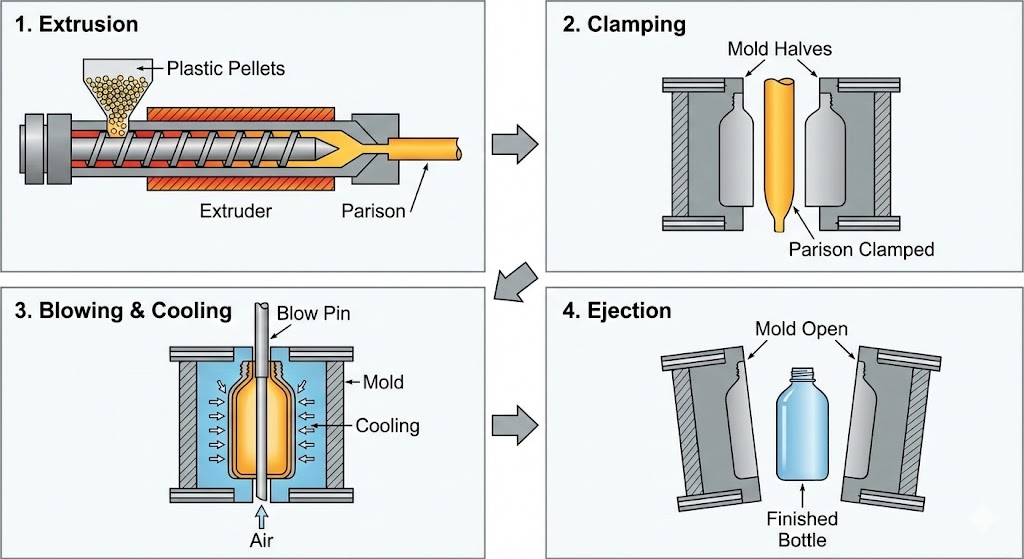
Step 1: Extrusion and Melting
It starts in the hopper. You feed in your HDPE pellets. For agrochemicals, we usually mix in a dark-colored masterbatch (like blue, green, or black) to protect the chemicals from UV light. This mixture goes into the extruder barrel.
Inside the barrel, a screw turns. This isn’t just pushing the plastic; it is “shearing” it. The friction creates heat, melting the plastic into a consistent, viscous fluid. If your screw is old or designed poorly, you will get “un-melted” spots or gels. These become weak points in your bottle. For agro bottles, I recommend a screw design that focuses on thorough mixing, especially if you are using recycled material (PCR).
Step 2: The Parison Formation
This is the magic part. The melted plastic is pushed out of the kepala cetakan vertically. It hangs down like a hollow tube. We call this the “parison.”
Here is where technology matters. If you use a basic machine, the tube has one thickness. But a bottle is not a simple shape. The neck is narrow, the handle is wide, and the bottom corners are sharp. If the tube is the same thickness everywhere, the corners will be too thin (weak) and the neck will be too thick (wasteful).
We use “Parison Control Systems” (often MOOG systems from Japan). This allows us to change the thickness of the tube as it is coming out. We can make the plastic thicker exactly where the bottle handle will be, and thinner in the safe areas. This saves you money on material and makes the bottle stronger.
Step 3: Blowing and Cooling
The mold closes around the parison. It cuts off the bottom and top, sealing the tube. Then, a blow needle (or blow pin) enters the neck. It blasts air inside. For EBM, the pressure is usually between 0.21 and 0.62 MPa.
The hot plastic hits the cold metal mold. The mold temperature is usually set between 50°C and 95°C. This rapid cooling hardens the plastic into its final shape. If you cool it too fast, you might get warping. If you cool it too slow, your cycle time (bottles per hour) drops, and you lose money.
Step 4: Ejection and Trimming
The mold opens, and the bottle falls out. In EBM, there is always extra plastic at the top (moil) and bottom (tail). This needs to be removed. In modern lines, like the ones I sell, this is done automatically by a “de-flashing” station. The scrap plastic is sent directly to a grinder to be reused. This closed-loop system is vital for your profit margins.
How do I select the right materials and molds for my agrochemical bottle production?
Choosing the wrong material is an expensive mistake. I have seen factories shut down for weeks because their mold design didn’t account for shrinkage. You need to match the material to the chemical.
For most agrochemicals, standard HDPE is sufficient. However, for sensitive chemicals, you should use Multi-layer Co-extrusion with EVOH to block oxygen. Your molds should be made of high-grade aluminum or steel with proper cooling channels, maintained at 50-95°C to ensure consistent cycle times.
Single Layer vs. Multi-Layer (Co-Extrusion)
This diagram illustrates the multilayer HDPE bottle wall structure, highlighting inner and outer layers, adhesive tie layers, and the EVOH barrier used in extrusion blow molding.
This is the biggest decision you will make. Let me break it down simply.
Option A: Single Layer HDPE
This is the standard. It is one layer of thick plastic. It works for 80% of agricultural products like standard fertilizers or basic pesticides. It is cheaper to run and the machines are simpler (one extruder).
Option B: Multi-Layer (Co-Ex)
Some chemicals are very sensitive. They might degrade if oxygen touches them. Or, they are so strong they smell bad even through the plastic. For this, we use Co-extrusion.
This machine has multiple extruders (usually 3 to 6). It combines different plastics into one parison. A typical structure looks like this:
- Outer Layer: HDPE (Virgin material, colored for branding).
- Regrind Layer: Recycled flash material (saves cost, hidden in the middle).
- Adhesive Layer: “Glue” to hold the layers together.
- Barrier Layer (EVOH): This is the star. EVOH (Ethylene Vinyl Alcohol) stops gas permeation. It blocks oxygen from getting in and chemicals from getting out.
- Adhesive Layer: More glue.
- Inner Layer: Pure HDPE (chemical hubungi safe).
Investing in a multi-layer machine costs more upfront. But if your client requires high-barrier packaging, it is the only way to get the contract.
Mold Design and Temperature Control
Your mold is not just a shape; it is a heat exchanger. The goal of the mold is to suck the heat out of the plastic as fast as possible so you can eject the bottle and make the next one.
If your mold cooling channels are designed poorly, you will have “hot spots.” The plastic will stay soft in those areas. When the bottle comes out, it will warp or shrink unevenly. This creates leaks.
We recommend molds with optimized cooling lines that can maintain a steady temperature range of 50-95°C. For agro bottles, the handle area is often the hardest to cool because the plastic is thickest there. A good mold maker will put extra cooling attention on the handle and the neck finish to ensure the cap seals perfectly.
What common production challenges might I face, and how can I overcome them?
No factory runs perfectly on day one. You will have waste. You will have ugly bottles. The difference between a profitable factory and a failing one is how quickly you troubleshoot these daily headaches.
Common challenges include uneven wall thickness, “flash” waste management, and pinhole leaks. You overcome these by using servo-driven parison control, installing automated de-flashing units with inline recycling, and using vacuum leak testers on 100% of your production line.

An automated leak tester checks rows of yellow plastic bottles on a high-speed conveyor after blow molding to ensure package integrity.
The Nightmare of Flash and Waste
Di dalam Cetakan Pukulan Ekstrusi, waste is part of the process. You always have the “flash”—the extra bits of plastic that get pinched off the top and bottom. If you are producing 5-liter jerry can, the flash can be 20-30% of the shot weight.
If you throw this away, you lose money. If you hire people to cut it off by hand, you lose money on labor and it looks messy. Ideally, you want an automated deflashing system integrated into the machine. It punches the flash off before the bottle even leaves the machine area.
Then, that scrap needs to go somewhere. We set up conveyor belts that drop the scrap directly into a granulator (grinder) next to the machine. A vacuum loader sucks the ground plastic (regrind) back up to the hopper and mixes it with new material. This is the “circular economy” inside your factory. For non-critical layers, you can use up to 30-40% regrind without hurting quality. This lowers your material cost significantly.
Solving Wall Thickness Issues
Have you ever seen a plastic bucket that feels flimsy in the corners but rock hard in the middle? That is bad distribution. In agrochemical bottles, a thin corner is a disaster waiting to happen.
The challenge is that gravity pulls the parison down. The tube gets thinner at the top because of its own weight (we call this “sag”). If your machine is slow, the sag is worse.
To overcome this, we use two strategies:
- Accumulator Head: For large containers (like 20L or 50L drums), we don’t extrude slowly. We fill a chamber with plastic and shoot it out quickly. This reduces sag.
- Parison Programming: As I mentioned earlier, the computer controls the die gap. It makes the plastic thicker at the top of the tube to counteract the stretching. If you are fighting uneven walls, 9 times out of 10, it is a programming adjustment, not a machine failure.
Ensuring The Seal Works
The neck finish is the most precise part of the bottle. If the top surface is not perfectly flat, the induction seal (the foil liner) will not stick. Leaks will happen.
Common issues here come from the “blow pin.” If the blow pin is not aligned perfectly, it will damage the neck. Or if the shear steel (the metal that cuts the plastic) is dull, it will leave a rough edge. Regular maintenance of your cutting blocks and blow pins is the easiest way to prevent thousands of leaking bottles.
Kesimpulan
Manufacturing agrochemical bottles requires a balance of strong materials, precise temperature control, and smart automation. By choosing HDPE, utilizing multi-layer technology for barriers, and strictly controlling your parison, you can produce safe, profitable containers. It is not just about making a bottle; it is about protecting the product inside.
Peran Saya
I am Slany Cheuang, the Technical Sales Manager at Mesin LEKA. I help factory owners like you navigate the complex world of cetakan tiup. I don’t just sell machines; I help you build a jalur produksi that makes money. Whether you are looking for a simple 1-liter bottle machine or a high-tech multi-layer line for hazardous chemicals, I can guide you to the right solusi.
My Target Audiences:
I write for business owners, production managers, and procurement heads in the packaging industry. You are the people who have to worry about ROI, electricity costs, and whether the machine will actually show up on time. You value straight talk over marketing fluff.
my Requirements:
If you are ready to upgrade your production or start a new line, you need a partner who understands both the engineering and the business side. At Mesin LEKA, we offer:
- Fast Delivery: We can get your machine ready in 60-90 days, not 8 months.
- Kustomisasi: We build the machine to fit your specific bottle drawing.
- Support: We don’t disappear after the sale. We help with installation and spare parts.


0 Komentar