


6 Key Checkpoints for Your Multi-Head EBM Machine

Hello everyone. In my work, I’ve seen this too many times: a buyer purchases a new multi-head extrusion blow molding (EBM) machine. On paper, the specs (like clamping force, extrusion volume) look perfect.
But six months later, they are struggling with unstable output, high scrap rates, and “unexplained” downtime.
What went wrong? They bought “specs,” not “sustainable productivity.”
This guide is for EBM buyers and bottle fabricants who are planning for long-term production, stable output, and future mold reusability. We’ll dive into the critical details that aren’t obvious on a quote sheet but will determine your profitability for the next ten years.
Please note: This article focuses only on multi-head applications for Extrusion Soufflage (EBM). It does not cover SBM (Stretch Moulage par soufflage) or IBM (Injection Blow Molding).
🎛️ Tip 1: Standardize Your Die Head Center Distance First
If you only remember one thing from this article, make it this.
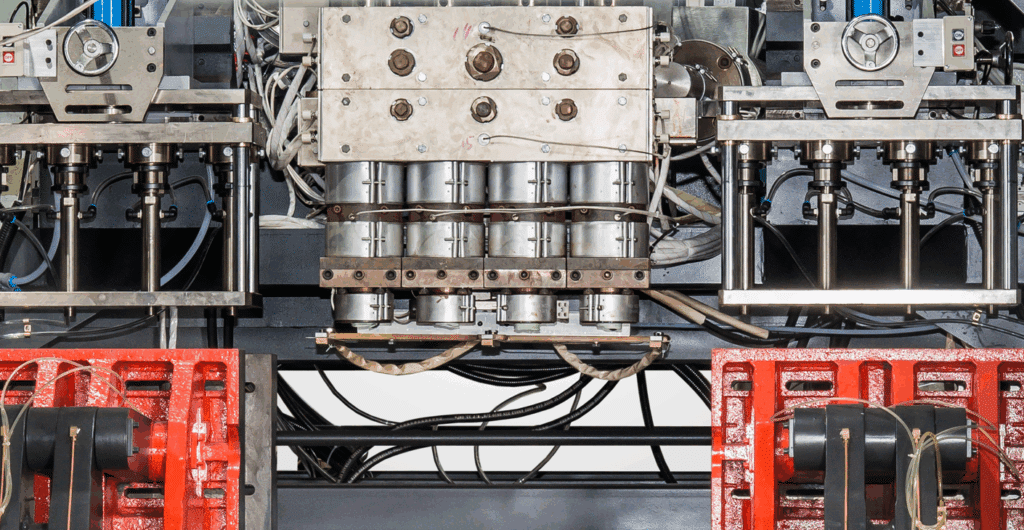
What is “Center Distance”?
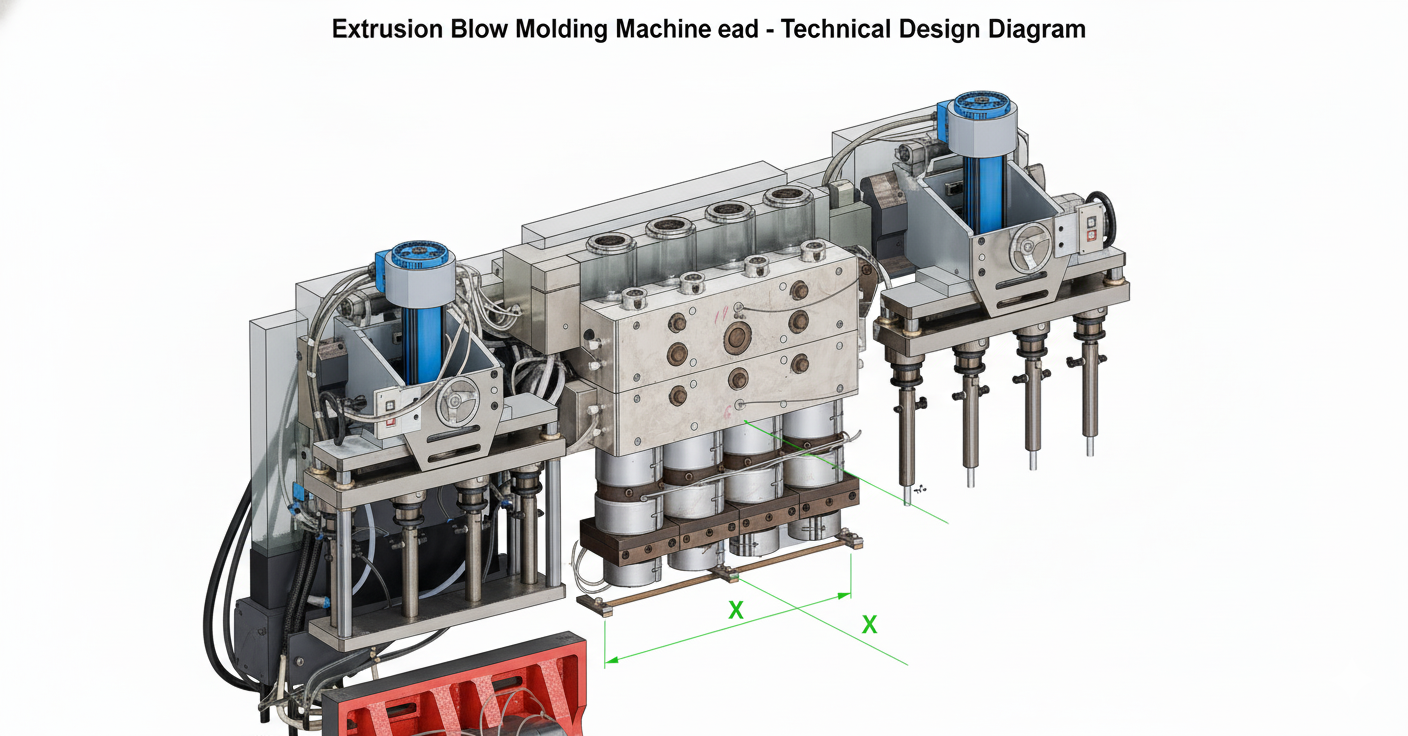
Multi-die head for an extrusion blow molding machine that divides melt and sets center distance for parallel parisons.
Simply put, Center Distance is the horizontal spacing between the center points of adjacent têtes de mort.
This number seems simple, but it’s like DNA. It dictates everything about your mold layout, cooling channels, trimming space, and (most importantly) future reusability.
Reference: Common Standard Center Distances (mm)
| Machine / Application Type | Common Center Distances (mm) | Notes |
|---|---|---|
| Small Bottles (e.g., 50-250ml) | 90, 100, 120, 127 (5 inches) | Increments of 10mm. This impacts clamping force and requires higher force and platen surface area. |
| Medium Bottles (e.g., 0.5-2L) | 120, 140, 150, 180, 200 | Increments of 20mm |
| Large Jerry Cans / Containers (e.g., 5-10L) | 200, 220, 240, 260, 280, 300 | Increments of 20mm |
Table 1. Common standard center distances (mm). Always ask your OEM (Original Equipment Manufacturer) for their standards.
Why do non-standard distances “lock in” your future?
Imagine you buy a dual-head machine from Company A with a 135mm center distance. You build 5 expensive molds for it.
Five years later, you need to expand capacity and want to buy a new quad-head machine from Company B (or even a new model from Company A). You discover the new standard is 140mm. Your five old 135mm molds won’t fit on the new machine.
You’re locked in. You either pay a fortune to remake all your molds, or you’re forced to buy the same obsolete, inefficient 135mm machine again.
Besides the extra cost, a custom – la plus adaptée à vos produits spécifiques, n'hésitez pas à me contacter chez Leka Machine. Nous sommes là pour vous aider à trouver la might also mean the factory isn’t familiar with the new design. This can lead to structural or mechanical design errors, which is fatal for blow mold production (in serious cases, the mold is unusable).
Buyer’s Guide
- Prioritize Standards: Always choose a published, industry-common standard center distance from your OEM. (You can reference industry leaders like Bekum, Kautex, Meccano… Additionally, LEKA Machine configures these component specifications according to industry standards).
- Handle Old Molds: If you already have non-standard molds, evaluate if you can salvage them by re-drilling the mold back-plates or using “adapter plates” avant buying a new machine.
Related Link: Learn how our standard machines d'extrusion-soufflage produce HDPE bottles.
📊 Tip 2: Plan for Realistic Throughput
We all love the simple math formula:
(Theoretical Output (kg/h) ÷ Bottle Weight (kg)) × Cycle Time Factor × Number of Heads = Bottles Per Hour.
This formula is theoretically correct, but it hides the biggest “capacity killer”: post-cooling and downstream processing.
I’ve seen too many teams obsess over shaving 0.5 seconds off the cycle time or adding two more heads, only to find their downstream equipment (trimming, leak testing, labeling, packing) can’t keep up.
It’s like putting a V8 engine in a family car but keeping the original tires and brakes. You can’t get the power to the road. The machine is constantly “starting and stopping” to wait, and your OEE (Overall Equipment Effectiveness) plummets.
Buyer’s Guide
- Create two Takt time tables:
- Theoretical Table: Based on the machine’s pure cycle time.
- Actual Table: Includes the full rhythm of cooling, trimming, leak testing, conveyor buffering, and manual packing.
- Find the Bottleneck: If your post-processing can’t keep up, it’s often better to reduce the head count (e.g., from 6 heads to 4) and ensure an extremely stable cycle than to have more heads that are frequently idle.
⚖️ Tip 3: Focus on Flow Balance and Wall Thickness Control
This is a classic problem on multi-head lines: bottles from the outer heads (e.g., 1 and 6) are too thin, while bottles from the middle heads (3 and 4) are too thick.
This is usually caused by asymmetrical melt flow resistance in the manifold. Plastic is “lazy”; it always takes the easiest, most direct path (i.e., to the middle heads).
The result? To save the thin-walled bottles on the edges (to pass leak tests), you have to increase the overall shot size. This makes the middle bottles severely overweight, wasting tons of raw material every day.
What to check:
- Symmetrical Flow Path Design: Ensure the manifold design naturally balances pressure.
- Individual Head Adjustment: Does the machine let you independently fine-tune the flow or temperature for each head?
- Multi-Point Parison Control: Is your parison control system robust enough to set different wall thickness profiles for different heads?
- Cpk and Scrap Rate: What is the process capability index (Cpk) for critical dimensions (like the neck finish and wall thickness)?
Buyer’s Guide
- Request Wall Thickness Maps: During the FAT (Factory Acceptance Test), don’t just look at one “golden sample.” Ask the supplier for thickness maps and Cpk data from all heads over a continuous run.
- rHDPE/PCR Test: If you plan to use recycled materials (rHDPE/PCR), you must confirm the machine’s mixing capability, filtration system, and control over “black specks.”
⚡ Tip 4: Use TCO (Total Cost of Ownership) to Judge Energy and Utilities
A machine’s purchase price is just the “ticket to entry.” The cost of running it for 15 years (TCO) is the real bill.
A multi-head machine is an energy hog. It’s not the power consumption of one machine; it’s the combined thermal load, air demand, and cooling requirements of multiple machines.
The metric we focus on most is kWh/kg (kilowatt-hours per kilogram of finished product). This is your factory’s “miles per gallon,” the ultimate measure of efficiency. A bad heating system or an inefficient hydraulic pump will continuously siphon off your profits for years.
Buyer’s Guide
- Demand Measured Energy Use: Don’t accept theoretical values. Require the supplier to measure the actual kWh/kg during the FAT, using your bottle and your cycle time.
- Audit Your Utilities: Make sure your cooling water tonnage, air pressure, and flow are designed for the peak load of a multi-head setup, not a single-head.
- Look for Energy-Saving Options: Ask about air recovery systems, VFD (variable frequency) blowers, or thermal recovery solutions. These small upgrades often have a payback period of 12-18 months.
⏱️ Tip 5: Evaluate Quick Mold Change (QMC) and Ease of Maintenance
It’s a simple truth: More heads = more complexity = more potential points of failure.
On a single-head machine, changing a heater band might take 30 minutes. But on a compact 6-head machine, reaching the heater on the middle head might require removing the adjacent heads, turning a 30-minute job into 4 hours of downtime.
Downtime is your biggest cost. On a multi-head line, 30 minutes of downtime, multiplied by 6 heads, means you’ve lost 3 total hours of production.
Buyer’s Guide
- Define the Mold Change Process: Ask the supplier to demonstrate the “hot swap” process. Are the quick-connects for water, air, and power easy to use and error-proof? Are there alignment pins for fast setup?
- Check Maintenance Access: Have your maintenance technician (not the supplier’s salesperson) personally check: Is it easy to replace heaters, thermocouples, cutters, and seals?
- Lock in Spares and an SLA: Define the “Day 1 Spare Kit” and Service Level Agreement (SLA) in the contract. And drill the replacement process once during installation.
🔗 Tip 6: Ensure Seamless Integration with Molds and Downstream Equipment
Finally, remember: the machine de moulage par soufflage itself doesn’t make money. Finished, quality-passed bottles on a pallet are what make money.
If your blow molder runs at 60 bottles per minute, but your leak tester or vision system can only handle 50, the OEE of the entire line will be crippled by the downstream bottleneck.
The machines must “talk” to each other.
Buyer’s Guide
- Define Interfaces Early: How will your machine communicate with downstream equipment (e.g., using OPC-UA/MQTT or simple dry-contact signals)?
- Set Sampling and Reject Rules: When the leak tester finds one bad bottle, how does the system react? Does it stop the whole machine, or just reject that one and automatically sample the two before and after it?
- Write Integration into the FAT/SAT: Your final acceptance checklist must include metrics for the entire line:
- Stable production rate (bottles/hour)
- Energy consumption (kWh/kg)
- Wall thickness specs (Cpk)
- Top-load / Drop test results
- Appearance and acceptance rate
Related Link: Learn how we integrate complete lines and see real factory case studies.
Conclusion
Buying a multi-head Machine EBM is a major long-term investment. Your goal shouldn’t be to buy the fastest “theoretical cycle” or the most “number of heads.” It should be to buy a predictable, stable, and efficient bottle production system.
By focusing on center distance, real-world throughput, wall balance, TCO, and integration early in the buying process, you change from a “machine buyer” to a “smart investor.” Choose a partner who is transparent and willing to work with you on these details.


0 commentaires